Quick instructions
| Sivusto: | TUNI Moodle | Tampere universities |
| Kurssi: | TUNI Moodle | Tampere universities |
| Kirja: | Quick instructions |
| Tulostanut: | |
| Tulostettu: | sunnuntai 12. heinäkuuta 2026, 09.28 |
Sisällysluettelo
- 1. What is Moodle?
- 2. Frequently asked questions
- 3. Login
- 4. Dashboard and navigation
- 5. Instructions for students in a nutshell
- 6. Quick guide for teachers
- 6.1. Create new course
- 6.2. Sisu and TUNI Moodle
- 6.3. Course templates (Kickstart format)
- 6.4. Copy course (import)
- 6.5. Student access to the course
- 6.6. Create groups
- 6.7. Managing tools
- 6.8. Add / remove participants
- 6.9. Add / delete blocks
- 6.10. Add / edit content
- 6.11. Set enrolment key
- 6.12. Allow enrolment without key
- 6.13. Publish / hide course
- 6.14. Delete course
- 6.15. Automatic course deletion process
- 6.16. Add background image
- 6.17. Export and save grades and activity
- 6.18. Accessibility in course creation
- 6.19. Additional help and tips
- 7. Instructions for activities
- 8. How to order special Moodle accounts?
- 9. Turnitin instructions
- 10. AI traffic lights
- 11. Mobile app
1. What is Moodle?
Moodle is a LMS (learning management system) where teachers can create course areas. Typically Moodle course area is like a course's home page that can contain materials, links, assignments and other activities. All staff members and students at Tampere universities can access TUNI Moodle.
Android and iOS app for Moodle are available from official app stores (Mobile app instructions).
Navigate this guide by selecting a page from the menu right side or just go forward to the next chapter by clicking the arrow on bottom right
Moodle version
TUNI Moodle uses Moodle long term support versions. Current version is Moodle 4.1 LTS.
1.1. Moodle upgrade Summer 2025
TUNI Moodle will be updated from Moodle 4.1 version to Moodle 4.5 version on Tue 1.7.2025 at 8:00 - 16:00. During the upgrade, you will not able to use Moodle or create new Moodle courses from Peppi or Sisu.
Key changes
Course page
- Clearer design, new activity icons
- Subsections
- Easier content management for teachers
- Bulk editing
- The Topics course format is now called "Custom Sections"
Quiz and question bank
- big version update for STACK qustion type, from version 4.4.6 to version 4.9.1
- Quiz-specific customizable question numbers
- Assessment targets within the exam
- Question bank:
- Easily rearrange question categories by dragging
- New search and filter interface in the Questions view (word search will come later)
Assignment
- replies on the Returns tab, replaces the "Show all returns" button
- In the Submissions view, actions at the top of the page
- Ability to send a message to selected students
- The teacher can award additional credits to students automatically or until the student has received a passing grade.
Other activities
- new Turnitin activity
Moodle 4.5 has an AI Subsystem and simple AI tools for generating text and images in Moodle's text editor, but they will not be activated in TUNI Moodle, at least for the time being.
Short videos about the new features (Youtube):
- Course page improvements in Moodle 4.2
- Activity cards redesign
- Course page improvements in Moodle 4.4
- Activity icons in Moodle 4.4
- Subsections in Moodle 4.5
- Bulk editing
- Assignment improvements in Moodle 4.5
- Gradebook enhancements
- Forum Improvements in Moodle 4.4
- Quiz Improvements in Moodle 4.4
- Ordering question type in Moodle 4.4
- LTI External tool improvements
A more detailed list of changes can be found on Moodle's own New Features pages:
Moodle 4.2 | Moodle 4.3 | Moodle 4.4 | Moodle 4.5
2. Frequently asked questions
- Login and credentials
- I can't login to TUNI Moodle?
- I forgot my password?
- I got “error/Unable to obtain session lock” error and can't use Moodle?
- Can I add external users to Moodle course?
- Course management (asked by student)
- How can I unenroll from course or hide unnecessary courses (asked by student)?
- I can't find course X (asked by student)?
- Create new course and course management (asked by teacher)
- I need new course?
- I can't find user X from Moodle?
- Could you add user X to Moodle course?
- How can I delete my old or unnecessary course (asked by teacher)?
- I can't find course X (asked by teacher)?
- Course materials (asked by teacher)
- How to copy course contents from old to new course?
- How to add new sections/topics to course?
- How to add link to course?
- How to add video to course?
- How to add very big files to course?
- How to add lecture recording to course?
- Sisu and TUNI Moodle
Login and credentials
I can't login to TUNI Moodle?
There are three different login methods available. Verify that you have selected correct one:
https://moodle.tuni.fi/login
Instructions: Login and reset forgotten password
https://moodle.tuni.fi/mod/book/view.php?id=230&chapterid=109
I forgot my password?
If you are an external user who has received a separate Moodle account. For example if you are participating continuing education courses. Reset your forgotten password here:
https://moodle.tuni.fi/login/forgot_password.php
If you have Tampere universities TUNI account (account ending with @tuni.fi), reset your forgotten password here:
https://salasana.tuni.fi
I got “error/Unable to obtain session lock” error and can't use Moodle?
Clear your browser cookies.
E.g. in Chrome browser:
https://support.google.com/chrome/answer/95647?co=GENIE.Platform%3DDesktop&hl=en
If you are an experienced user, you can also locate only "moodle.tuni.fi" site spesific cookies and delete only those.
E.g. in Chrome browser:
https://support.google.com/chrome/answer/95647?co=GENIE.Platform%3DDesktop&hl=en
Can I add external users to Moodle course?
Users with user account of another Finnish University can login to TUNI Moodle through HAKA login:
https://moodle.tuni.fi/login
You can order special Moodle accounts to TUNI Moodle for other external users.
Instructions: How to order special Moodle accounts?
https://moodle.tuni.fi/mod/book/view.php?id=230&chapterid=1245
Course management (asked by student)
How can I unenrol from course or hide unnecessary courses (asked by student)?
A) Tampere University students:
If your course has not started yet, cancel your enrolment in Sisu. Data/changes from Sisu to TUNI Moodle is updated once an hour. If course has already started and you can't cancel your enrolment anymore, contact Sisu support to abort your course.
Only if you have enrolled to Moodle course with enrolment key shared by teacher, you can also unenrol from course by yourself in Moodle:
Go to the course > Select More tab (under the course title) > Unenrol me from...
Courses in Moodle are visible for students as long as course's teacher keeps the course published.
Tip: You can hide unnecessary courses from Moodle dashboard by marking all important courses with a start and then:
https://moodle.tuni.fi/my > Show settings > Show favourites only
B) TAMK students:
If your course has not started yet, cancel your enrolment in Pakki and wait until the next day. If course has already started and you can't cancel your enrolment anymore, contact the teacher of the course to abort the course.
Only if you have enrolled to Moodle course with enrolment key shared by teacher, you can also unenrol from course by yourself in Moodle:
Go to the course > Select More tab (under the course title) > Unenrol me from...
Courses in Moodle are visible for students as long as course's teacher keeps the course published.
Tip: You can hide unnecessary courses from Moodle dashboard by marking all important courses with a start and then:
https://moodle.tuni.fi/my > Show settings > Show favourites only
I can't find course X (asked by student)?
It may be that the course exists and your are a student on the course, but the course is still hidden from students. If you suspect that the course should already be visible to students, contact course's teacher directly.
Not all courses use Moodle. If you are not sure, contact course's teacher directly and ask about learning environments used in the course.
Verify that you have enrolled to the course in Sisu (Tampere University) or Pakki (TAMK).
You can find all your Moodle courses from Moodle dashboard:
https://moodle.tuni.fi/my
If you have marked some courses as favourites and therefore all courses are not visible on Moodle dashboard:
Show settings > Number of courses to display > Always show all (top option)
Create new course and course management (asked by teacher)
I need new course?
Create new TUNI Moodle course here:
https://moodle.tuni.fi/mod/page/view.php?id=58
(Moodle dashboard: https://moodle.tuni.fi/my > Create new course)
I can't find user X from Moodle?
Moodle user profile is automaticall created when user logs in to Moodle first time. After that the user can be found from Moodle.
Ask the user to login to Moodle:
https://moodle.tuni.fi/login
After that you can find the user and e.g. add the user manually to your course.
If you need to add several users to your course, use enrolment key.
Instructions: Set enrolment key
https://moodle.tuni.fi/mod/book/view.php?id=230&chapterid=118
Students enrolled to Sisu implementation will be added to TUNI Moodle course if the TUNI Moodle course has been created in Sisu and teacher has confirmed the enrolments in Sisu.
Instructions: Sisu and TUNI Moodle
https://moodle.tuni.fi/mod/book/view.php?id=230&chapterid=5095
Could you add user X to Moodle course?
Only course's teachers can add additional teachers and students to the course. IT Helpdesk can only add users to course if permission from your supervisor is provided.
If Moodle course has been created in Sisu (Tampere University) or Peppi (TAMK), add new users to the course through Sisu or Peppi.
Instructions: Sisu and TUNI Moodle
https://moodle.tuni.fi/mod/book/view.php?id=230&chapterid=5095
How can I delete my old or unnecessary course (asked by teacher)?
You can move the course to trashbin if you are a teacher in the Moodle course. After the course has been moved to trashbin it will be available 30 days in trashbin and after that the course will be permanently deleted.
Instructions: Delete course
https://moodle.tuni.fi/mod/book/view.php?id=230&chapterid=121
I can't find course X (asked by teacher)?
You can find all your Moodle courses from Moodle dashboard:
https://moodle.tuni.fi/my
If you have marked some courses as favourites and therefore all courses are not visible on Moodle dashboard:
Show settings > Number of courses to display > Always show all (top option)
If the course is still missing, verify that you have created a Moodle course for your course implementation.
Instructions: Create new course
https://moodle.tuni.fi/mod/page/view.php?id=58
Course materials (asked by teacher)
How to copy course contents from old to new course?
If your old and new Moodle courses are in TUNI Moodle you can copy all or only some of the content from the old course to the new course.
Instructions: Copy course (import)
https://moodle.tuni.fi/mod/book/view.php?id=230&chapterid=113
How to add new sections/topics to course?
Turn editing on and click "Add section" link (or + icon) located at the bottom of the course area.
How to add link to course?
Add "URL" resource to the course:
Turn editing on > Click + icon on the course page > Activity or resource > Select "URL"
Fill-in name and actual URL.
Of course you can also add links using Moodle's editor. E.g. add link into forum post or assignment description.
How to add video to course?
Add videos to video service first and then embed or link the videos from video service to Moodle. Do not upload video files directly to Moodle. For performance reasons, the maximum allowed file size in TUNI Moodle is 100 Mb.
Instructions: Uploading videos to Moodle course
https://intra.tuni.fi/en/handbook/2677/2743/10802?page=2742
More use case instructions
https://intra.tuni.fi/en/handbook/2677/2743/10802
How to add very big files to course?
For performance reasons, the maximum allowed file size in TUNI Moodle is 100 Mb.
Share very big files from Office 365 OneDrive and just add links to Moodle course. Sharing a folder and all files/subfolders in the shared folder is also possible.
If you are a teacher, you can, for example, paste the shared file link to a course page in Moodle. All students will be able to access/download the file without logging into OneDrive.
If you are a student, you can, for example, paste the shared file link to an assignment you return to Moodle. The teacher will be able to access/download the file without logging into OneDrive.
Instructions: Office 365 OneDrive: File sharing
https://sites.tuni.fi/digitaltoolkit/materials-and-presentations/office-365-onedrive-file-sharing/
If there is also a lot of student collaboration required in the course, consider using TUNI Groups (Office 365 Teams) as an additional service along Moodle course.
Instructions: Group working via Teams during large courses
https://sites.tuni.fi/digitaltoolkit/interaction-and-engagement/group-working-via-teams-during-large-courses/
How to add lecture recording to course?
The most common use cases:
A) The teacher wants to record a lecture as a review material for the students. The teacher wants to record it on a personal computer and publish it on Moodle.
Instructions: Training video created by the teacher on own computer
https://www.tuni.fi/it-services/handbook/2743/10802?page=9688
B) The teacher wants to record a lecture as a review material for the students. The teacher wants to use the recording equipment at the lecture room and publish the lecture on Moodle.
Instructions: Video services for events
https://intra.tuni.fi/en/handbook/2677/2743/2794?page=2738
Sisu and TUNI Moodle
I need many Moodle courses to one Sisu implementation?
You can create only one TUNI Moodle course for one Sisu implementation in Sisu. If you need more TUNI Moodle courses, you can create additional courses manually to "Other" category. Note that you must invite students to these courses with enrolment key or add students manually.
Instructions: Sisu and TUNI Moodle
https://moodle.tuni.fi/mod/book/view.php?id=230&chapterid=5095
Why there are not any students in my Moodle course?
Students enrolled to Sisu implementation will be added to TUNI Moodle course if the TUNI Moodle course has been created in Sisu and teacher has confirmed the enrolments in Sisu. If "enrolment period with direct confirmation" setting is used in Sisu implementation, students will be added automatically to TUNI Moodle course.
If needed, students can be added manually or by enrolment key directly to TUNI Moodle course (e.g. external students without TUNI account).
Instructions: Sisu and TUNI Moodle
https://moodle.tuni.fi/mod/book/view.php?id=230&chapterid=5095
Why there are students in my Moodle course who are not enrolled in Sisu implentation?
If there are unknown students in Moodle course who have not enrolled in Sisu check the following first:
Have you or other teacher in the course activated enrolment key in Moodle course? By default enrolment key is not activated in new Moodle courses.
Have you or other teacher in the course manually added students to Moodle course?
3. Login
Go to TUNI Moodle: moodle.tuni.fi
There are three login options: moodle.tuni.fi/login/
- Login with TUNI account
If you have Tampere universities user account. - Login with HAKA account
Login with a user account of another Finnish University. - Login with special Moodle account
External users who have received a separate Moodle account, for example if you are participating continuing education courses. If have forgotten your special Moodle account password, reset your password here.
Please note multi-factor authentication.
(Teacher or other responsible person may order special Moodle accounts: How to order special Moodle accounts?)
Logout from Moodle by selecting your profile icon on top right > Log out
3.1. Multi-factor authentication
This guide applies only to logging in with a special Moodle account.
If you log in using a TUNI account or an account from another university via HAKA authentication, multi-factor authentication already takes place before accessing Moodle and Moodle does not request any further verification.
To improve Moodle’s security, multi-factor authentication (MFA) was introduced for special Moodle accounts on 18 May 2026. Multi-factor authentication adds an extra verification step to the login process and provides stronger protection for your Moodle user account, for example against phishing attacks.
After 18 May 2026, logging in to TUNI Moodle requires, in addition to your username and password, at least one verification method.
Available verification methods
The following verification methods are available in TUNI Moodle:
✅ Email verification (default)
You will receive a verification code by email when logging in.
✅ Authenticator app
For example Google Authenticator, Microsoft Authenticator, or a similar app that generates a one-time verification code.
✅ Security key
A physical device (e.g. a USB security key) used to verify your login.
This is a particularly secure option.
What do you need to do?
If you want to use email verification only, you do not need to do anything in advance. After multi-factor authentication has been enabled, when you log in to TUNI Moodle, Moodle will prompt you to enter a numeric code that is automatically sent to your email after you have entered your username and password.

If you want to use other verification methods, or if emails sent by Moodle do not reliably reach your inbox, you can configure an additional verification method in your Moodle user settings:
- Open the user menu by clicking your profile picture in the top-right corner
- Select Preferences from the menu
- Choose Multi-factor authentication preferences from the list of links
- Configure an Authenticator app and/or a Security key.
You can configure only one authenticator app in Moodle. You can configure multiple security keys. You can manage and change your verification methods in the same place.
Why is this important?
Multi-factor authentication:
- protects your user account even if your password is compromised
- improves the overall security of Moodle
- is a common and recommended practice in higher education institutions and organizations
Problems signing in?
I did not receive an email from Moodle. What should I do?
Check your email spam folder and, in Outlook, also the Other view of the Inbox or the Junk Email folder. Also try the email client’s search function.
Email details:
Subject: Here's your verification code
Sender: Do not reply to this email (via TUNI Moodle) <noreply-tuni@mmg.fi>
If you cannot find the email, try signing in to Moodle again after half an hour. The code is valid for 30 minutes, and only after that will Moodle send a new code to your email address.
My email address is no longer valid. How can I change my email address in TUNI Moodle?
Contact IT Helpdesk. Changing the email address also requires confirmation from the person who ordered your Moodle account.
If you need help setting up a verification method or encounter problems, please contact the IT Helpdesk: it-helpdesk@tuni.fi
4. Dashboard and navigation
Dashboard
After login, you will be redirected to your dashboard page.
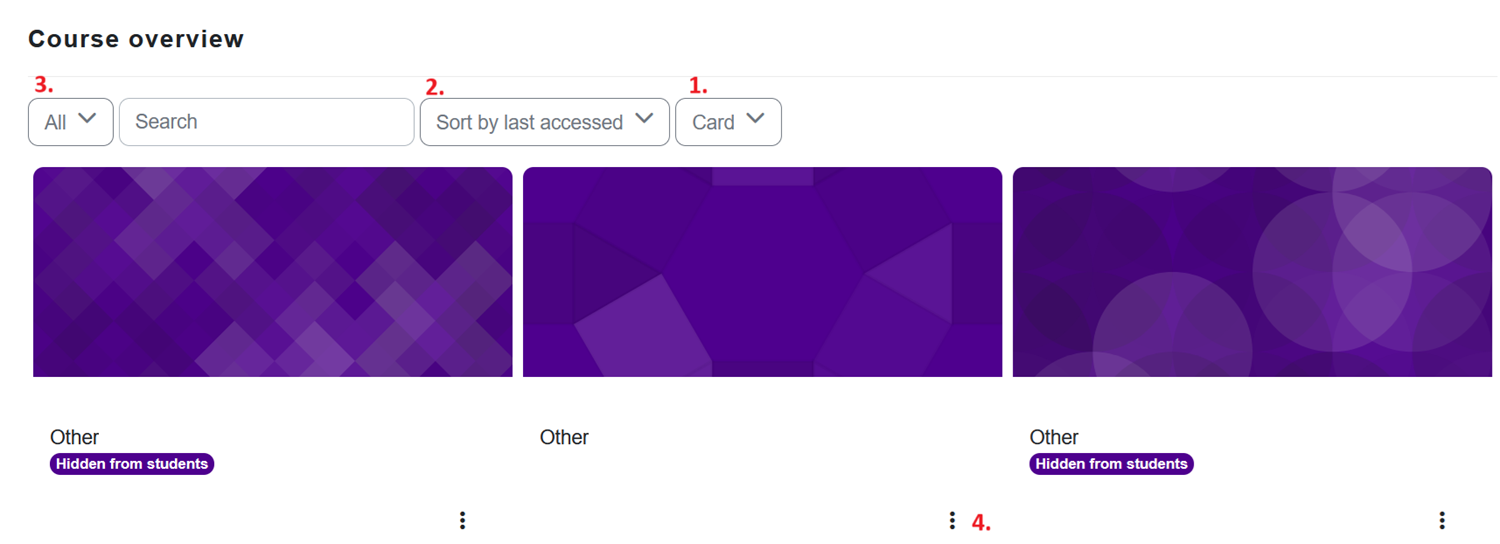
You can organise your course listing on your dashboard in different ways.
1. To view the course list in grid view with images, select Card as the display mode, or as a more concise list, select either List or Summary to display not only the course names but also their descriptions. Change the view from the menu above the course names.
2. You can sort the courses alphabetically by name or by when you last accessed, to get the most active courses to the top of the list.
3. From the menu on the left, you can filter the view by selecting All, In progress, Future, Past, Starred, or only the courses that were removed from the view.
4. You can remove unnecessary courses from the view or star the courses you want from the menu you find by clicking the three dots next to the course name.
🎬 See video about managing course list and adding your own course link list to dashboard (video in Finnish, captions in English)
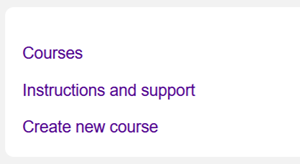
In the block in the upper right corner you have quick links to:
- Courses: all visible courses in TUNI Moodle
- Instructions and support
- Create new course (for teachers)
Navigation (header area)

1. Open side menu (if you are in course area, e.g. table of contents will be shown here)
2. Back to Moodle front page
3. Back to your dashboard
4. Search courses
5. Open notifications menu
6. See the messages other Moodle users have sent to you
7. Open menu from which you can e.g. edit preferences and change language
8. Turn edit mode on/off
5. Instructions for students in a nutshell
How do I log in to Moodle?
How do I join the course area?
How do I change a forgotten password?
My profile settings
Dasboard settings
How do I leave the course area?
How do I log in to Moodle?
You will find TUNI Moodle at moodle.tuni.fi.
There are three login methods in TUNI Moodle, which you will find on the page moodle.tuni.fi/login/.
Login with TUNI account
If you are a student at Tampere University or Tampere University of Applied Sciences, log in with your TUNI account.
Login with HAKA account
If you are a student at another Finnish higher education institution, log in with your own institution's account. Choose your own institution from the menu and log in with your own account.
NOTE! If you are a CampusOnline, FiTech or JOO student and have received a TUNI account, always use your TUNI account in TUNI Moodle.
Login with special Moodle account
If you have been provided with a special Moodle account for logging into TUNI Moodle, log in with the account you received.
Log out of Moodle by clicking on your profile icon in the upper right corner and selecting Log out from the menu that opens.
How do I join the course area?
Students are automatically enrolled to most courses based on confirmed registrations. You will see these courses on your dashboard when you are logged into Moodle.
Some courses may require registration with a key. If registration with a key is enabled, you will receive a key from the teacher. The teacher can also give the address of the course area in connection with the key, but if you don't know the address, search for the course in Moodle by typing its code, name or part of the name in the search field at the top of the page. Click on the name of the course from the search results, enter the enrolment key you received in the field and press the Enrol me button. Please note that the key must be written in the exact correct format, taking into account upper and lower case letters. When you have registered with the key for the first time, the course will remain visible on your dashboard.
How do I change a forgotten password?
Change the password of your TUNI account (you will switch to another service)
Change the password of your special Moodle account
My profile settings
Edit your profile settings by clicking on the profile icon in the upper right corner. From the menu that opens, select Profile -> Edit profile.
How do I add a picture to my profile?
You can add a picture to your user profile. Click on the profile icon, select Profile -> Edit profile from the menu that opens and go to User picture on the page. Add an image in .jpg or .png file format from your computer to the server either via the file picker or by dragging and dropping and update profile. Please note that the maximum file size allowed in Moodle is 100 Mb and the image cannot be saved if it is larger than this. When saving, the image file is cut into a square and its size changes to 100 x 100 pixels.
Dasboard settings
When you log in to Moodle, you will be redirected to your dashboard page where you will see all your courses.
You can organize your course listing in the Course overview section in different ways.
To view the course list in grid view with images, select Card as the display mode, or as a more concise list, select either List or Summary to display not only the course names but also their descriptions. Change the view from the menu above the course names.
You can sort the courses alphabetically by name or by when you last accessed, to get the most active courses to the top of the list.
You can remove unnecessary courses from the view or star the courses you want from the menu you find by clicking the three dots next to the course name.
From the menu on the left, you can filter the view by selecting All (except removed from the view), In progress, Future, Past, Starred, or only the courses that were removed from the view.
How do I leave the course area?
You can unenrol yourself from a course only if you have registered for the course with an enrolment key. In that case, you will find the unenrolment function in the Moodle course tabs under the course name. Select the More tab to unenrol yourself from the course.
If you are a student at the Tampere University, you are able to cancel your registration in Sisu before the start of the study period, after which you will also be automatically removed from the Moodle course area within one hour. If the course is already running and you are no longer able to cancel your registration in Sisu, contact Sisu support.
If you are a TAMK student, you can cancel your registration in Pakki before the start of the study period. If the course is already running and you can no longer cancel the registration in Pakki, ask the teacher to remove your confirmed registration from Peppi, after which you will be automatically removed from the Moodle course area the next night as well.
Course areas are visible to students in Moodle as long as the teacher keeps the course area published. However, on your Moodle dasboard, you can hide unnecessary course areas by removing them from your view. Select Remove from view behind the three dots. From the menu on the left, you can display these course areas if you want, by selecting Removed from view.
6. Quick guide for teachers
- 6.1. Create new course
- 6.2. Sisu and TUNI Moodle
- 6.3. Course templates (Kickstart format)
- 6.4. Copy course (import)
- 6.5. Student access to the course
- 6.6. Create groups
- 6.7. Managing tools
- 6.8. Add / remove participants
- 6.9. Add / delete blocks
- 6.10. Add / edit content
- 6.11. Set enrolment key
- 6.12. Allow enrolment without key
- 6.13. Publish / hide course
- 6.14. Delete course
- 6.15. Automatic course deletion process
- 6.16. Add background image
- 6.17. Export and save grades and activity
- 6.18. Accessibility in course creation
- 6.19. Additional help and tips
6.1. Create new course
TAU: Course implementations
- Create new Moodle course in Sisu
Add "TUNI Moodle" classification to implementation in Sisu (more instructions).
TAMK: Course implementations
Teacher training school: Courses
Other courses: Create new course by yourself
- Create new course to 'Other' category
You need the Course Creator role in the 'Other' course category. Request the needed user rights at https://id.tuni.fi/- Identity management →
- Manage your own user rights →
- Apply for a new user right →
- Browse or search IT > Moodle learning platform > Moodle learning platform (TUNI-Moodle) Course creator and click Choose.
- Your new user rights will become valid in Moodle in about one hour. You will not receive a separate notification that your rights have been activated.
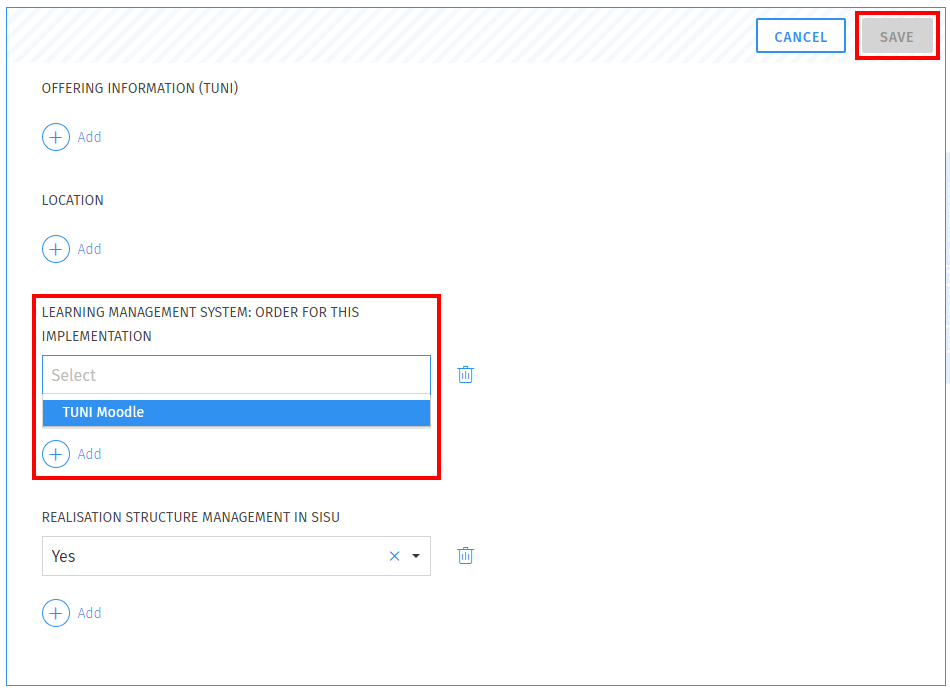
6.2. Sisu and TUNI Moodle
Data/changes from Sisu to TUNI Moodle is updated once an hour (between xx:30 - xx:45)
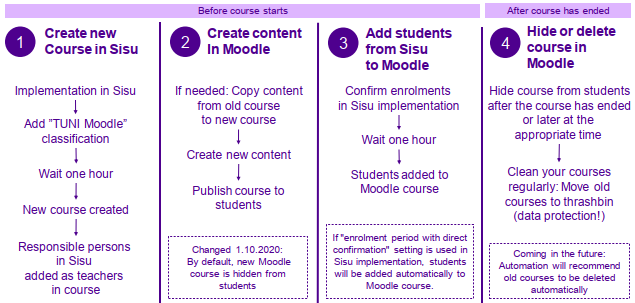
Create new TUNI Moodle course for Sisu implementation
- Login to Sisu: https://tuni.fi/sisu
- Select implementation from Sisu
- Implementation information -tab > Classification
- Edit
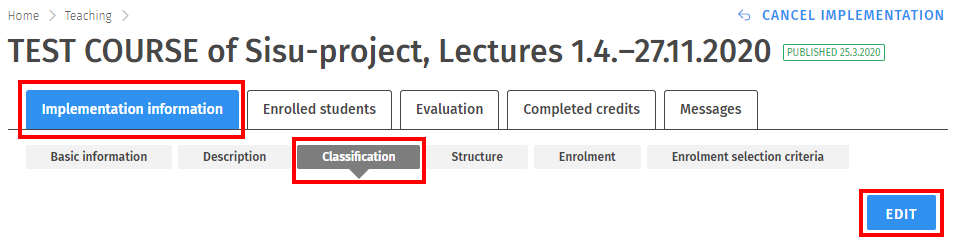
- Learning management system: Order for this implementation > Add > Select "TUNI Moodle"
- Save
After "TUNI Moodle" classification has been added, new TUNI Moodle course will be created to "Course implementations - TAU" category if all the following conditions are matched:
- Implementation end date is in the future in Sisu (implementation is ongoing or has not started yet)
- Implementation has at least one responsible teacher or teacher in Sisu
- Implementation language is set in Sisu
- Implementation name and name specifier are set in the same language as implementation language in Sisu
- Implementation is connected to course that has course code in Sisu
After the TUNI Moodle course has been created, all responsible teachers and teachers will also get an email notification about the new TUNI Moodle course.
All responsible teachers and teachers will be added automatically as teachers to the new TUNI Moodle course.
TUNI Moodle course name and link to the course are visible in Sisu implementation information: Description > Learning environments
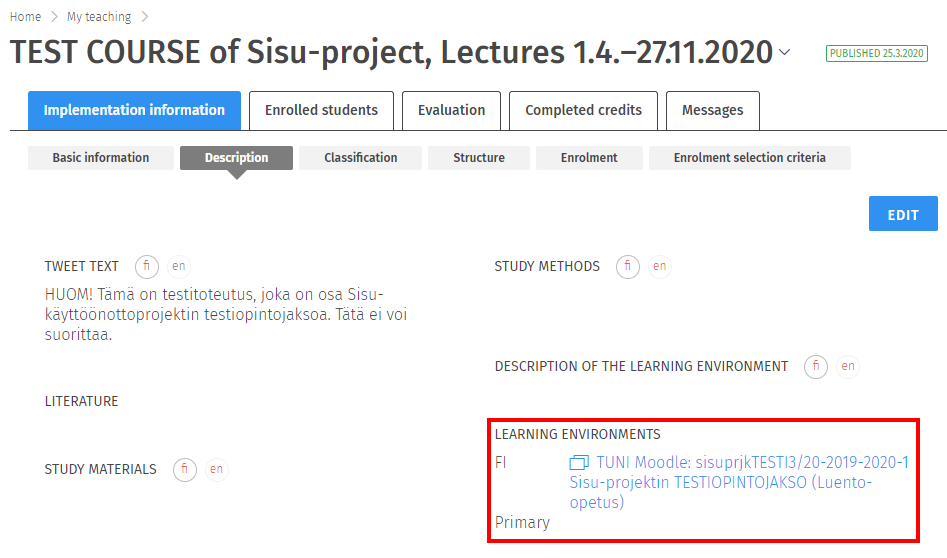
By default, new Moodle course is hidden from students. Remember to publish Moodle course to students before the course begins.
You can create one TUNI Moodle course for one Sisu implementation in Sisu. If you need more TUNI Moodle courses, you can create additional courses manually to "Other" category. Note that you must invite students to these courses with enrolment key or add students manually.
Copy content from old course to the new course
If needed, you can copy content from your old existing TUNI Moodle course to the new empty TUNI Moodle course: Copy course (import)
Add teachers
If you add more responsible teachers or teachers in Sisu to the implementation, these users will be added automatically to TUNI Moodle course.
Remove teachers
If you remove responsible teachers or teachers in Sisu from the implementation, these users will not be removed from TUNI Moodle course or user roles will not be changed. This logic ensures that it's also possible to add teachers to TUNI Moodle courses directly from TUNI Moodle without Sisu (e.g. external users, not member of the Tampere University)
If teacher has been added to TUNI Moodle course from Sisu and afterwards teacher needs to be removed: Remove teacher first from Sisu implementation and then remove the teacher from TUNI Moodle course area or change role to student or non-editing teacher.
Add students
Students enrolled to Sisu implementation will be added to TUNI Moodle course if the TUNI Moodle course has been created in Sisu and teacher has confirmed the enrolments in Sisu. If "enrolment period with direct confirmation" setting is used in Sisu implementation, students will be added automatically to TUNI Moodle course.
If needed, students can be added manually or by enrolment key directly to TUNI Moodle course (e.g. external students without TUNI account).
Remove students
If student or teacher cancels student's enrolment in Sisu, the student will be automatically removed from TUNI Moodle course. Removing student directly from TUNI Moodle course will not work if the student has enrolled to the implentation in Sisu. Enrolments must be cancelled in Sisu.
Delete course
If TUNI Moodle course created from Sisu is not needed after all:
- Remove "TUNI Moodle" classification from Sisu implementation
- Remove link to "TUNI Moodle" course from Sisu implementation information
- Delete course from TUNI Moodle
6.3. Course templates (Kickstart format)
When you have created a new Moodle course in Sisu, Peppi, or manually and go to your course for the first time as a teacher, first choose how you will start building your course.
The following options are available:
- Choose one of the ready-made default templates to structure your own course.
- Copy one of your old courses as the basis for the new course. (Check the course visibility setting (show / hide) immediately after copying, because the visibility setting is copied from the old course.)
- If you want to start from a completely empty course, go to editing the course settings and change the course format.
When you are creating a course manually to the "Other" category and want to select one of the ready-made templates for your course structure, fill in the Course full name and Course short name fields and save them at the bottom of the page. Do not change the course format from the menu, but select a template from the page that opens after saving.
Option 1: Ready-made course template
The ready-made templates are
- Default template (Grid), which is specifically designed as the basis for large mass courses offered in contact teaching, but is also suitable for an online course. The template emphasizes visuality.
- Default template (Custom sections) (used to be Topics), which is specifically designed as the basis for large mass courses offered in contact teaching, but is also suitable for an online course. The template is especially suitable for courses with a lot of content.
- Seminar, which is designed specifically for seminar-type and thesis courses.
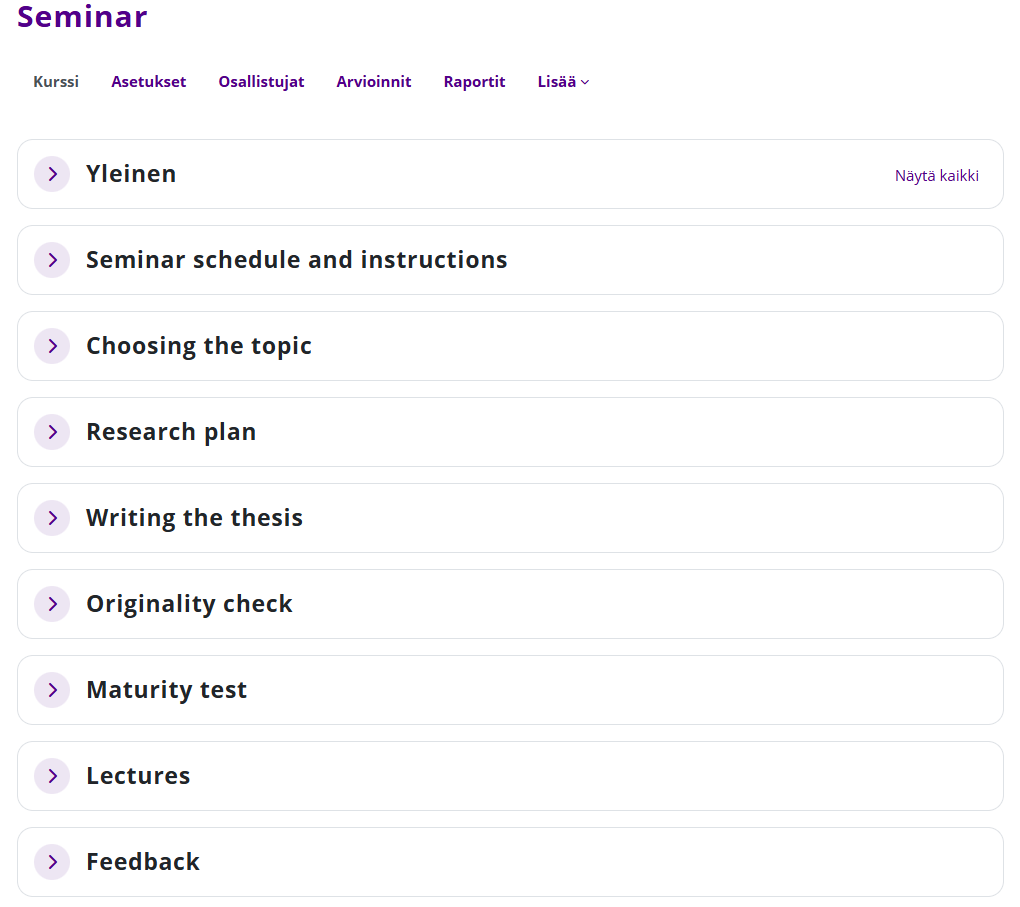
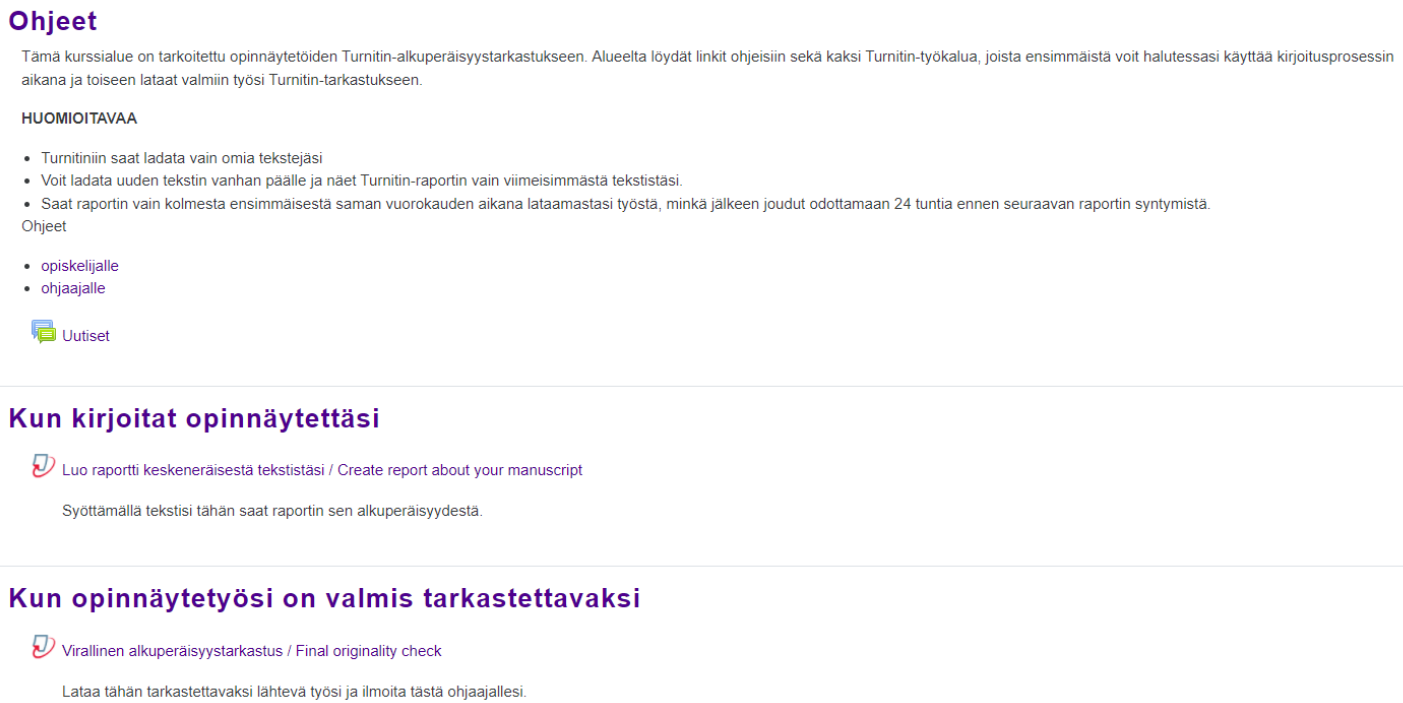
- Turnitin for thesis supervisors (the template is bilingual, you will see the texts in English if you use Moodle in English).
Before making selection, you can view the templates using the preview buttons. The selected template cannot be changed later.
Each template is designed to have a clear structure from which information and materials can be easily found. Use the templates as a model or inspiration for creating a course, however you are free to customize them to suit your own course needs.
Once you have selected a template, first read its instructions. You will find a link to instructions in each template.
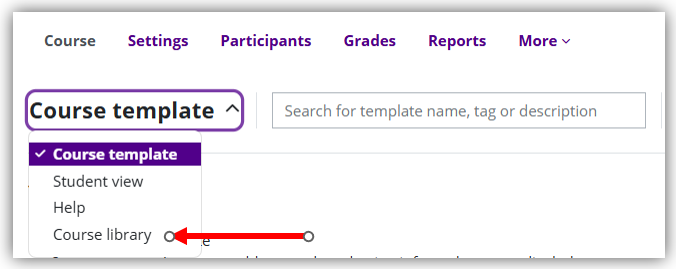
Option 2: Copy from an old course
By selecting Course library from the Course template dropdown menu, you will see a list of courses where you are a teacher. Select a course from the list or search for it using the search function. Use the Import course button to copy the desired content from the course as the basis for a new course.
NOTE! The course visibility setting (show / hide) is also copied in the import. If the course you copied from is visible to students, the new course you copied content to will also be visible to students. Remember to check the visibility setting immediately after importing. Hide the course until it is ready to publish to students.
When copying a course, Moodle automatically changes the date settings for assignments and other activities by moving the dates and times forward by the difference between the start dates of the old and new courses. To ensure that the start and return times for assignments do not change, make sure that the start date times of the old and new Moodle course areas are the same. In Moodle courses created by Sisu, the start time is 02:00 in winter time and 03:00 in summer time. In course areas created by Peppi and created in the Other course category, the start date time is 00:00 by default.
Option 3: An empty course
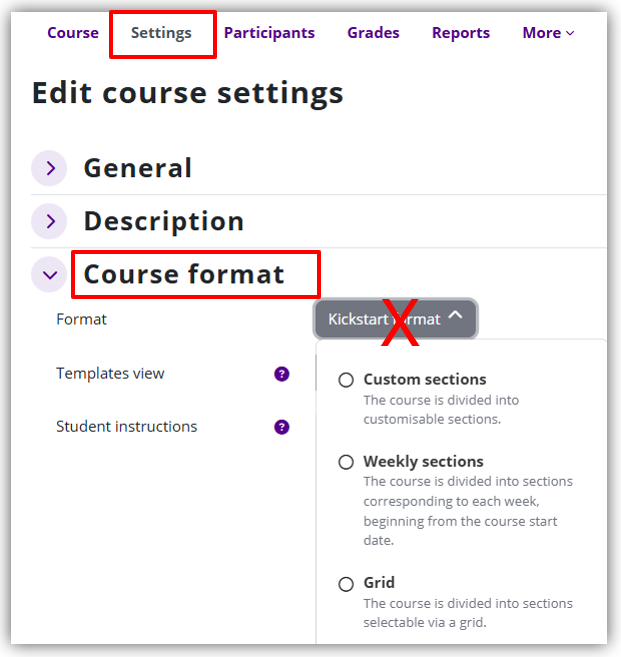
To start building a course on a new blank basis, click the Edit course settings button on the right side of the page or Setting course tab and select the desired course format from the settings.
6.4. Copy course (import)
Copy contents from one course to another within TUNI Moodle
When you have created a new blank course area in Sisu, Peppi, or manually in the Other category, you can copy content to the new empty course from another course. You have to be a teacher on both courses - both the course you are copying from and the course you are copying to.
The copy includes course files, tools, and structure, but users or their activities (e.g. discussions and files they have uploaded) are NOT included in the copy.
The first copy should usually be done to an empty course using the Kickstart default course format’s course copy function; see Quick instructions: Course templates (Kickstart format).
- Go to your empty Moodle course
- Make sure that a course format other than Kickstart is selected in the course settings. Change it from the Course format menu if necessary.
- Select the More tab and then from the menu Course reuse.
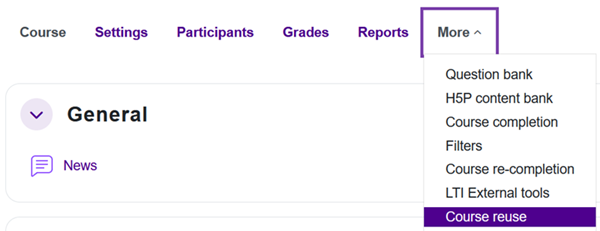
- Select from the menu Import.
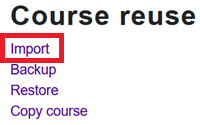
- Find your old course to import content from > Select the course > Continue
- On the following pages, select which activities you want to copy. NOTE! If there is a Turnitin tool in the area, it must not be copied. Each Turnitin tool must be created separately.
- Proceed from page to page with the Next buttons and finally press the Perform import button.
- You find the imported files and activities in the corresponding sections on the new course where they were in the old course.
- If the new course contains Panopto activities (linked videos) setup a new link between the activity and video by clicking the activity. See also the instruction How to re-use old videos in a new Moodle course
6.5. Student access to the course
Students' access to the course is affected by how the course has been created and how the teacher hopes that students will enter the course:
1. The TUNI Moodle course has been created in Sisu (Tampere University) or Peppi (TAMK) and students enrol to Sisu or Peppi implementation
- Students will be automatically added to the course when teacher has confirmed the enrolments in Sisu or Peppi
- Teacher can also set enrolment key or enrol students manually
2. Teacher has manually created the TUNI Moodle course
- Students enrol themselves using the enrolment key
- Teacher allows enrolments without an enrolment key
- Teacher enrols students manually to the course
6.6. Create groups
By dividing students into groups, you can take advantage of the opportunity to work in groups on the course. Activities that support students’ work in groups include e.g. forum, database and wiki.
The principle of the Moodle group function is that the teacher first creates the groups and then uses the group division he/she has made in the activities of his/her choice. When the teacher decides to use groups in an activity, he/she also decides whether the students will work in closed groups or whether they will be allowed to follow the work of other groups.
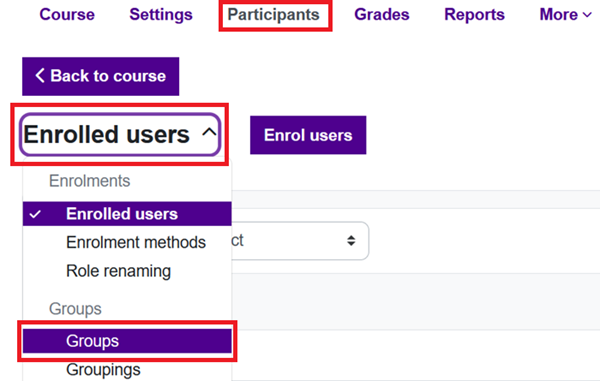
Create groups
To start creating groups, select the Participants tab on the main page of the course and then from the menu Groups.
You can create groups manually or auto-create them by using Moodle's automatic group creation feature. Students must be enrolled on the course so as to add them in a group.
Create groups manually:
- Start creating a group with the "Create group" button.
- Name the group and save it.
- Select members of the group via the "Add / remove users" button.
Auto-create groups:
- Start creating groups with the "Auto-create groups" button.
- Select the group naming scheme: groups with names containing either letters or numbers. Press the question mark icon for instructions on selecting a naming scheme.
- Select whether the auto-creating of groups will be based on number of groups or members per group.
- By default, students are allocated into groups at random, but you can also use alphabetical order, for example.
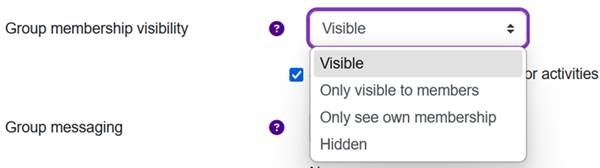
In the group settings, you can choose whether the group and its members are visible to students.
Set group mode for each activity
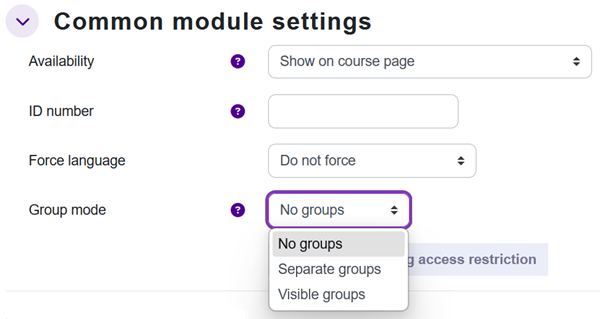
Once you have created groups, select whether to use groups in each individual activity. For example, the course may have forums that are common to all, as well as forums where students work in groups.
For example, if you want groups to work completely separately on a forum or wiki, without seeing each other's work, select "separate groups" as the group mode for the activity. If you want students to be able to follow the work of other groups as well, select "visible groups" as the group mode for the activity.
NOTE. If no groups have been created with Moodle's group creation function, the group mode of all activities must be "no groups".
You can set the group mode either from the activity settings:
or from the menu that opens behind the three dots on the course page or from the group mode button:

6.7. Managing tools
You find the most common managing tools in the tabs below the course name:

- Course: Enter the main page of the course.
- Settings: General information about the course, e.g. start and end times and course format. Hide or show the course.
- Participants: You can view the list of participants in the course, add and remove participants and change their roles. You can enable self-registration and set an enrolment key. You can also create groups and manage them.
- Grades: You can view the gradebook of the course, where the grades you have given for the assignments and exams are stored.
- Reports: You can check activity of the participants in the course.
- More: You can access the question bank and the H5P content bank, edit course completion settings, copy course, backup the course or restore a backup file.
The managing tools block, like other blocks are no longer automatically visible in courses. They are on the right side behind the drawer. You can open and close the blocks from the drawer.
6.8. Add / remove participants
Students enrolled to Sisu (TAU) or Peppi (TAMK) implementation will be automatically added to TUNI Moodle course if the TUNI Moodle course has been created in Sisu (TAU) or Peppi (TAMK).
In other cases, it is recommended to primarily invite students to the course using the enrolment key or by allowing enrolment without the key. If you enrol students manually to the course they can't unenrol from the course.
Add participants
On the Participants tab, you can add users to the course in different roles, remove them from the course, and view and edit their roles.
Only a user who is already logged in to TUNI Moodle can be added to the course. If you are adding a participant to the course that Moodle cannot find, first ask him/her to log in to TUNI Moodle once.
There is an "Enrol users" button at the top and bottom right of the page.
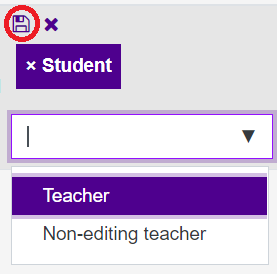
- Enter the name of the teacher or student you want to add in the field and click the name that appears.
- Select the role to which you want to add the user to your course: Teacher, Non-editing teacher, or Student.
- Click the "Enrol users" button.
Change the roles of participants

Remove participants from the course
If necessary, you can completely remove a user from the course by clicking the trash can icon in the last column.NOTE. This way, you can only remove a user whom you have added to the course manually or who has enrolled to the course with a key. Removing a student who has enrolled to the implentation in Sisu manually from the course does not permanently remove him/her from the course. Enrolment must always be cancelled in Sisu, after which the student will only be permanently removed from the course.

6.9. Add / delete blocks
If necessary, you can add blocks to the right edge of the course area, which can be auxiliary functions of the course or contain other additional information.
Are you not sure if blocks are needed, do not use them unnecessarily, as they will not show up at all in Moodle's mobile app, for example.
Add a block
- Turn editing on.
- Open blocks from the drawer, if they are not visible.
- The Add a block button appears in the upper right corner, which opens a list of blocks.
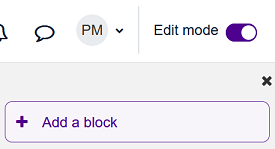
- Select a block from the list
Remove a block
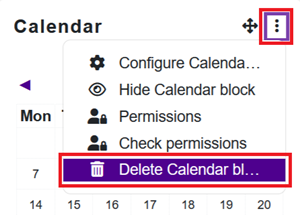
- Turn editing on
- Select from the drop-down menu of the block: Delete block
6.10. Add / edit content
Edit activities on the course
When edit mode is on, you will see a button with three dots next to each activity you have already added. Click the dots to open a menu where you can, for example, edit, move, duplicate and delete the activity, set it visible or hide it, assign roles and set group mode for it.

Bulk actions
When edit mode is on, you can use bulk actions to assign a specific action (availability, duplicate, move, delete) to multiple activities at once.
Click the Bulk actions link in the upper right corner of the course area.
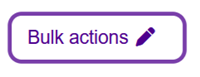
Select the activities you want and the action you want to assign to them.

Add content
When edit mode is on, you can hover your mouse over each activity and resource to see a plus sign button below it, which you can click to add content to that location. You can add an activity or resource, or a sub-section.
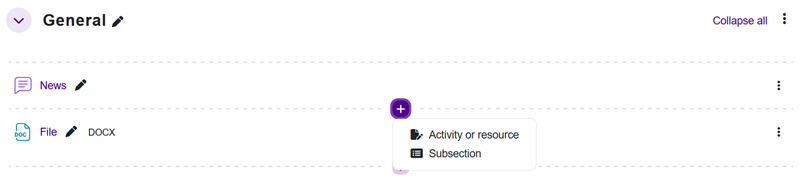
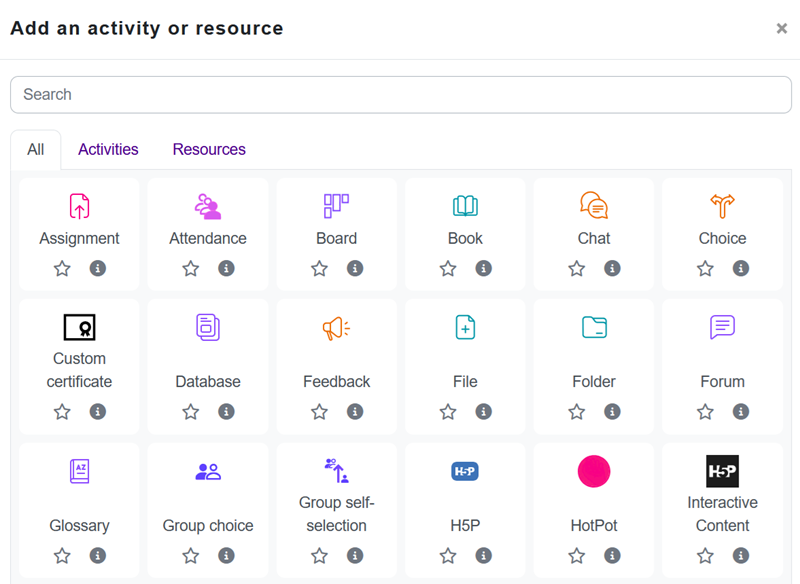
Add an activity or resource
Select an activity or resource from the list.
Add a sub-section
Name the subsection using the pencil button. You can also go directly to adding activities and resources to the subsection.
NOTE: Do not create subsections if you are using the Tiles or Onetopic format. Subsections will not work properly in these formats.

Find more instructions from the official Moodle documentation: Managing a Moodle course (opens in new window)
6.11. Set enrolment key
Course enrolment key is not needed if TUNI Moodle course has been created in Sisu (Tampere University) or Peppi (TAMK) and students are enrolled to the implementation in Sisu or Peppi.
If TUNI Moodle course has been created manually to "Other" category:
- Set enrolment key and share the key and course URL to students (read more below)
- Allow all TUNI Moodle users to enrol without enrolment key
Set enrolment key
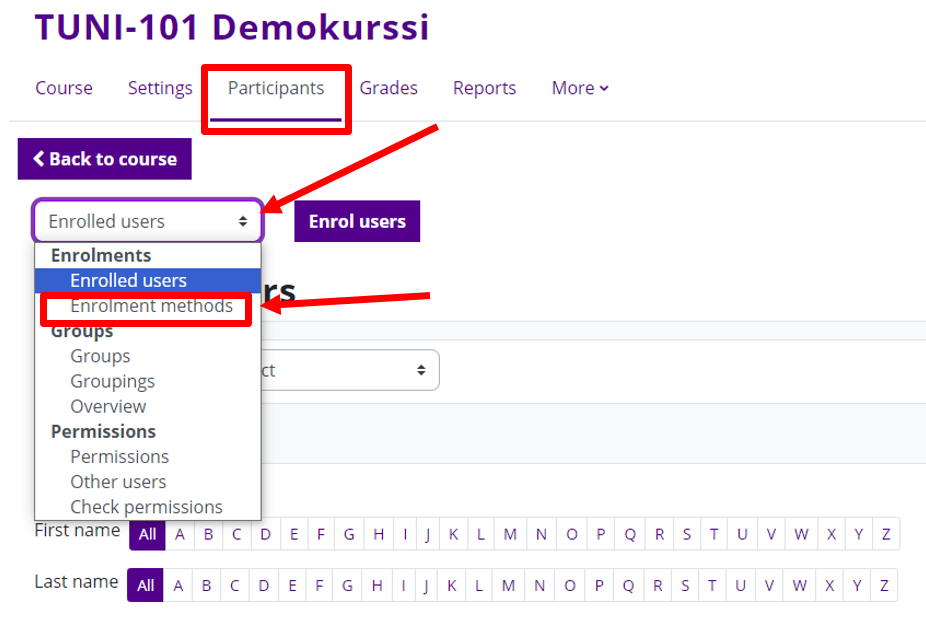
On the Participants tab, select Enrolment methods.
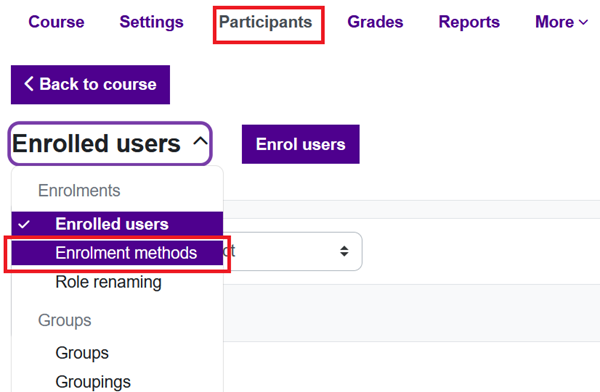
Enable self-enrolment as a way to add students (click to open the eye) and go to the self-enrolment settings from the edit button (pencil).

Set the enrolment key and save. Students must use the key you set here when registering in the area. The key can be e.g. one single word, it does not have to contain special characters or numbers.

If you use the Managing tools block, you can also set the enrolment key from there. Setting the enrolment key from the Managing tools block also activates self-registration.
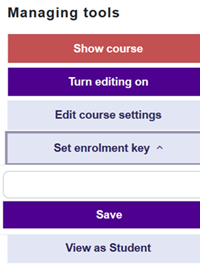
- After you have set the enrolment key, you can check what the key is by clicking: Managing tools > Check enrolment key
- Then you can publish the course area (show course) and share the enrolment key and URL to the course area, so students can enrol in course.
Delete enrolment key
- Managing tools > Check enrolment key
- Set empty enrolment key. If enrolment key is empty, users can't enrol in course area by themselves. If you want allow all TUNI Moodle users to enrol your course area without enrolment key, check instructions "Allow enrolment without key".
6.12. Allow enrolment without key
Self-enrolment without enrolment key is not needed if TUNI Moodle course has been created in Sisu (Tampere University) or Peppi (TAMK) and students are enrolled to the implementation in Sisu or Peppi.
If TUNI Moodle course has been created manually to "Other" category:
- Set enrolment key and share the key and course URL to students
- Allow all TUNI Moodle users to enrol without enrolment key (read more below)
Enable self-enrolment without enrolment key
- Go to your course > switch to Participant tab > open Enrolled users drop-down menu > select Enrolment methods
- Enable self-enrolment (Student) > Click closed eye icon
- If you need more advanced options > Click pencil icon next to eye icon

Now all TUNI Moodle users can enrol in course without enrolment key.
6.13. Publish / hide course
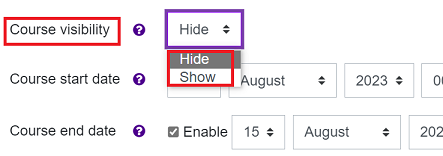
By default, course is visible only to the teachers specified in the course's enrolled users list. Students can't access the course until you publish the course. The teacher will see a closed eye icon in front of the name of the hidden course.
![]()
Under the title of the course, go to the Settings tab and on the settings page, go to Course visibility. Publish the course area by selecting Show from the menu.
If you use the Managing tools block, you can also publish the course from there: Show course.
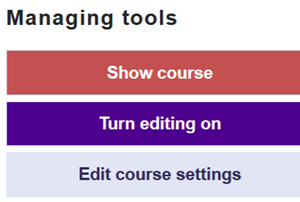
When the course is published (visible to students) the button is green.
You can hide the course from the Managing tools: Hide course.
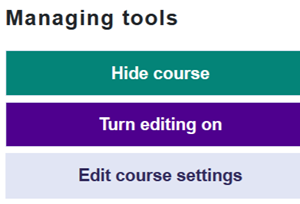
It's important to hide the course after course has ended and students no longer need to access the course materials. By hiding the course old courses will not clutter students course lists. Hidden course and all student materials are still visible for all teachers on the course.
6.14. Delete course
According to the assessment rules of Tampere Universities, written or otherwise recorded assignments given and assessed to demonstrate competence must be retained for 6-12 months from the completion of the overall assessment of the course.
Teacher should delete courses with student data from Moodle if one year has been passed since the course has been actively used. For example it is over one year since the last assignment has been submitted or assessed.
If there are more than one teacher in the Moodle course, please verify from other teachers that the course can be deleted.
Move course to trashbin
Go to the course area -> Select from Managing tools -> Move course to trashbin.
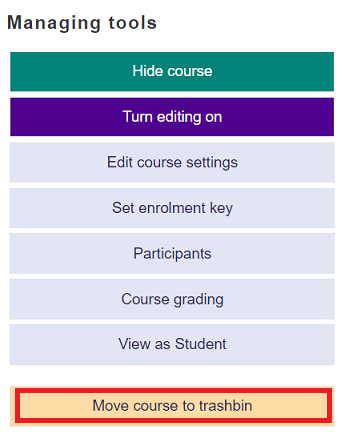
After the course has been moved to trashbin it will be available 30 days in trashbin and after that the course will be permanently deleted.
If you accidentally moved a course to the trashbin, contact immediately IT Helpdesk (it-helpdesk@tuni.fi).
Copy course contents from course to be deleted to another course
Instructions: Copy course (import)
6.15. Automatic course deletion process
In January 2023, TUNI Moodle introduced an automatic deletion process for unused courses. At first, there was only one deletion criteria: the course end date specified in the course settings. Since February 2024, unused courses will be deleted based on the last time the course was visited. If you as course teacher want to avoid automatic deletion of a specific Moodle course, you need to do two things:
- Edit the course end date in the course settings, up to a maximum of 2-3 years in the future, or disable the end date altogether if you need the course longer. Do not select an end date of 2030, for example, because an end date far in the future will break Turnitin tasks, among other things.
- Visit the Moodle course pages at least once every two years.
If you have student role, you can't change course end date. Instead, please contact the course teacher.
If you receive an email from Moodle that your course has been moved to trashbin or your course was deleted:
- If it is less than a month since the course was moved to the trashbin: find the course in Moodle and restore it from the trashbin using Managing tools block's button "Restore from trashbin". Remember to edit the end date in the course settings.
- If it's been more than a month since the course was moved to the trashbin and you received a "course deleted" message: contact the IT Helpdesk, tell them the name of the course and ask them to restore it from the trashbin.
Reasons and a more detailed description of the removal process
The recommendation is to create a new Moodle course for each implementation of the course. This results in a large number of obsolete Moodle courses from past implementations that have not been used for a long time, and a large number of courses with the same name. It can be difficult for students to find the right courses. It therefore makes sense to regularly close and remove obsolete and unused courses in a centralised manner. This will also clarify the list of your own courses in Moodle.
According to the TAU and TAMK Information Management Plans, the retention period for student work is 6-12 months after the final assessment. After this period, student work should be deleted. Deleting outdated course areas will help to meet this requirement.
For the reasons mentioned above, an automatic deletion process for unused TUNI Moodle courses was introduced in January 2023.
Courses with more than 12 months from the end date OR no visits for more than 24 months will be included in the automatic deletion process. Courses will not be deleted immediately, but teachers of the course will be informed by email. Teachers will receive two different messages at different stages of the deletion process. The stages of the process are:
- Step 1: If the course is open to students, it will be closed so that it will not be visible to students. The course is moved to the trashbin and teachers are notified by email. Teachers can still access the course and can restore the course to the original course category for a period of one month.
- Step 2: After one month, the Moodle course is moved to the hidden category and is also hidden from teachers. Moodle will send second email about course deletion. The restoring of the course must be requested from the IT Helpdesk within 6 months.
- Step 3: The Moodle course is deleted after 7 months from the start of the deletion process and it is no longer possible to restore the course.
Manual deletion of courses is still possible and recommended, as a teacher you can start the same deletion process using the Move course to trashbin function in the Managing tools block.
If you want to delete the student submissions but save the Moodle course content and assignments, first duplicate the assignment activity (Turn editing on > activity Edit menu > Duplicate) and then delete the original assignment activity. Note that deleting the activity will also delete the student submission and grading data from the Moodle grading book, so do this at the earliest 6 months after the final assessment. Deleted course content can be restored for 7 days in the course's own Recycle bin.
When a teacher creates a Moodle course in Peppi or Sisu, the end date of the course area is automatically set to the end date of the course implementation in Peppi/Sisu. If you create a course in the Moodle Other course category as staff member, the default end date is one year forward from the time of creation. As a teacher, you can edit the end date of the course 1-3 years in the future if necessary, or disable it in the case of a long term course or a custom base course from which you copy content to new courses each year.
The unused status of a Moodle course is determined from the Last access to course dates displayed in the participants list, based on the current participants in the course. Teachers' and students' visits are treated equally here. Persons who are no longer members of the course are not taken into account in this reasoning. It should also be noted that copying course content does not count as a visit, so you should visit and open your course pages at least once a year.
FAQ
1. What happens to the Panopto videos linked to my Moodle course during the removal process?
The Panopto course video folder created through the Moodle course or its videos are not automatically deleted at the same time as the Moodle course is deleted. However, permissions are automatically updated at different stages of the removal process:
- In step 1, students will lose viewing access to the Panopto folder and videos if the Share settings for the folder or videos have not been modified.
- In step 2, teachers will also lose all access to the course video folder and its videos, unless the teacher has separately added creator permission to himslef/herself in the folder's Share settings.
- In step 3, nothing happens to Panopto videos, they remain on the Panopto platform without permissions, i.e. only Panopto administrators can see them in Panopto, unless the default settings have been modified. Videos are removed from Panopto based on Panopto's own removal rules, see section "Panopto recordings lifecycle" on the page Panopto Video Service Instructions.
If Panopto videos are allowed to be viewed anonymously with just a link, such direct viewing links will continue to work after the Moodle course has been removed.
2. I have copied the contents and Panopto videos of the Moodle course to be removed to the new Moodle course. Will the removal of the old course affect the new Moodle course and Panopto video copies?
In principle, it does not affect if the video links in the new Moodle course are in the new Panopto folder. An exception is if the video links made with standard Share video links are in the Panopto folder of the old course even in the new course, and you have added viewing rights for the students of the new course to the Share settings in the old folder. In this case, for students in the new course, the video links will work, but as a teacher, you may lose the creator rights to the video folder during the process of deleting the old course. To avoid this, you should change the standard Share links to Panopto LTI single video-type links in Moodle or separately add creator permissions to yourself in the Share settings in the old folder. For instructions on the different linking methods, see the IT instructions: Adding videos to Moodle course.
3. I can't find the Moodle course or Panopto video folder I need as a teacher. What should I do?
First, log out of Moodle and then log in again. In this way, you will restore the teacher role and permissions to the Moodle course, where you may have used the function "Switch role to student". After this, make sure that no filters are applied to the course listing in your Moodle dashboard view. It is also a good idea to search for a lost course by course name and code using Moodle's course search function. If the former do not help, contact IT Helpdesk.
4. Student: The old Moodle course disappeared, even though I still need it. What should I do?
The teacher has either hidden the course from the students, or the automatic removal of the courses has done so. Contact the teacher of the course and ask him/her to publish the Moodle course back to students. Already during the implementation of the course, it is worth discussing with the teacher how long the students should retain access to the Moodle course. The default for automatic deletion is one year after the end of the implementation, but the teacher can extend the usage time by editing the end date of the course. The end date of the course is not visible to students.
6.16. Add background image
When edit mode is on, there appears in the upper right corner of the course area a button, which you can press to add a background image to the course area.
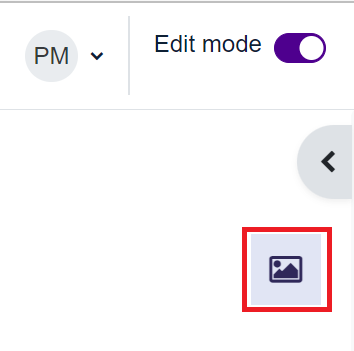
Add an image file from your device via the file picker or by dragging with the mouse.
Choose whether to display the image at the top of the page as a header or as a full page background.
However, the course background will not become a decorative picture of the course, so it will not appear in the course listing on your desktop.
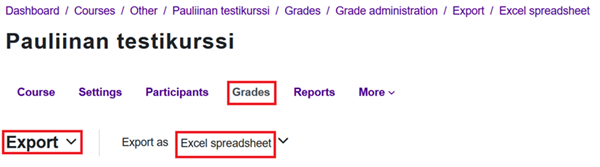
6.17. Export and save grades and activity
How to export and save participants' grades and other activity (submissions and other content) outside Moodle.
Grades
Grades tab -> Export -> Excel spreadsheet -> Download
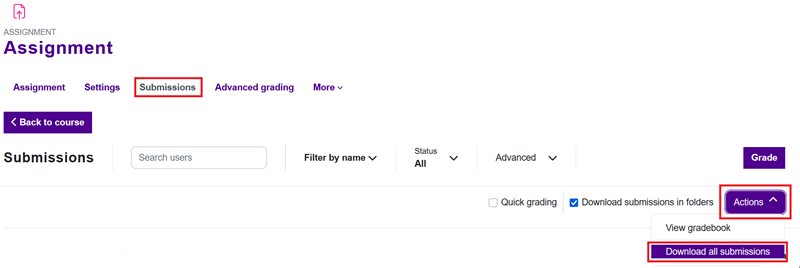
Activities
Assignment
Open assignment -> Submissions tab -> Open Actions menu -> Download all submissions.
Database
Open database -> select Actions -> Export entries -> Select: 'Include user details' and 'Include time added/modified' -> Export entries
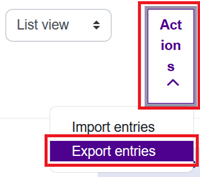
Database will be saved as CSV file that can be opened e.g. with Excel.
Forum
To save all messages and comments at once is not possible. Copy messages or whole discussion threads manually and paste e.g. to Word document.
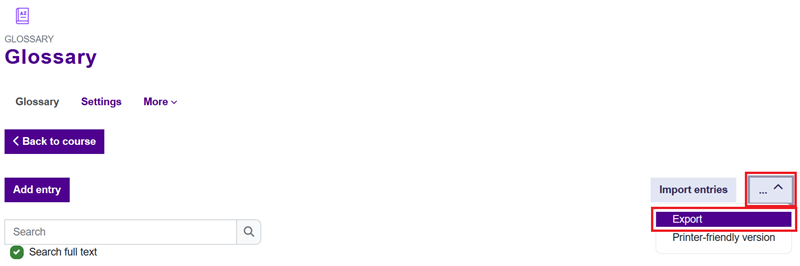
Glossary
Open glossary -> select Export -> Export entries to file
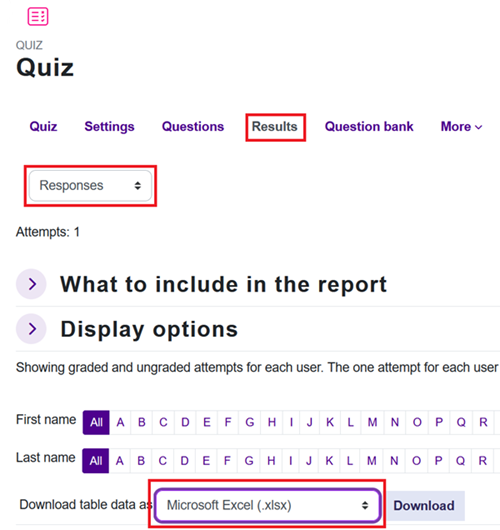
Quiz
Open quiz -> Results tab -> select Responses from the menu -> Download table data as -> Microsoft Excel (.xlsx) -> Download
Wiki
To save all wiki pages and comments at once is not possible. Copy pages or comments manually and paste e.g. to Word document.
Importing evaluations to Sisu
Evaluations can be imported as a csv file into the implementations of the course. You can upload one csv file at a time, the maximum size of which is 2 Mb.
As a basis for the evaluation, you can take a ready-made file with the students confirmed for the implementation and the columns ready. In the course implementation in Sisu, you will find the function Download evaluation data as a csv file in the three-point menu.
In order to bring the file back to Sisu, it must be saved in csv format. The imported data must have the same credits and completion language as the evaluation object and the grade must be on the evaluation scale.
Press the Import assessment data button, select the file and send. Submitting the file takes the assessment given in the file to the students.
6.18. Accessibility in course creation
Course structure
Build the course logically and consistently. Divide large entities into smaller parts, avoid large masses of text. Make sure the navigation is clear.
Use clear and descriptive titles in sections and activities that make the text easy to read.
Avoid using only visual means such as colors or shapes to convey information.
Offer content in different formats, e.g. text and videos.
Avoid the Collapsed topics course format as it is not accessible.
Avoid using blocks if they are not necessary.
Producing content for the course
Text
Use styles for headings and subheadings and consistently follow their hierarchical order from highest to lowest: H1, H2, H3, etc. The text can only have one main heading at the H1 level, after which the first subheading level is H2 and the next subheading level is H3. Do not skip levels, e.g. by switching from an H1-level heading to an H3-level heading, so that the screen reader user gets a correct understanding of the page's heading structure. Organize the text into short and clear entities with the help of headings and make sure that the headings are clear, descriptive and informative. Prefer sentence headings.
Avoid long sentences in the text and strive for as clear a language as possible. Use a clear, non-serial font. Avoid underlining the text, which the reader can easily interpret as a link, as well as unnecessary bolding and italics. If you use colors, ensure sufficient contrast so that the text stands out clearly from the background.
Picture
Add a description text (alt text) to each image you use, which tells the screen reader what is in the image. Strive for a clear and informative expression and bring out what is essential in the picture. Always end the description text with a full stop, even if it is not a complete sentence, because the sound of the screen reader pauses at the full stop. This way, the alternative text stands out better from the rest of the text that continues after the image.
If you use the image as a decoration or illustration and the image you use does not contain any relevant information, a description text is not needed. In this case, mark the image as decorative.
For maps, charts, diagrams and other more complex images, it is usually necessary to write a full text equivalent instead of a description text.
Link
Use descriptive link texts. Avoid using web address or type formatting as “read more here” as link text. Make sure that the links stand out from the mass of text due to their appearance.
When you use an image as a link, tell where the link leads to in the description of the image.
According to accessibility guidelines, it is generally recommended to make links so that they open in the same browser window. If you set the link to open in a new browser window, add to the link the information that the link opens in a new window. If the link leads to another site or a file opens from the link, tell about it in connection with the link.
List
Lists make the text easy to read. Prefer lists in the text when possible, but make sure that the lists do not become too long and heavy.
Table
Use tables deliberately and only when the table format is necessary to present the issue, as tables are difficult for screen readers. Don't use tables only for text formatting or content layout.
If you use a table, don't use a picture of the table, but create the table in Moodle's own editor. Add headers to both the table and its rows and columns. Make sure there are no empty cells, rows or columns in the table and avoid merging cells. Avoid a table that is too wide, as scrolling the page horizontally is difficult.
Videos and audio recordings
Subtitle the videos you produce in presentation language or create text equivalents for them. Prepare text equivalents for the recordings you produce, e.g. podcasts. You can publish the text equivalent on its own page. Prepare the text equivalent with Moodle's page tool rather than e.g. as a pdf file, because the page is more accessible.
Accessibility of documents
Make sure that the documents you produce are accessible before you import them into Moodle. You can check the accessibility of files, e.g. with the accessibility check function of Microsoft Office programs.
H5P content
Some H5P content types are accessible, meanwhile others are not. Familiarize yourself with H5P content types recommendations (the link opens another web page).
6.19. Additional help and tips
Additional help
Additional tips for advanced use cases
- Gradebook can help the teacher to automate course assessment
- Tracking progress and using activity completion can help the teacher and also the students to follow the progress of the course better
- Groups can help the teacher to give different assignments to different students in the same course
7. Instructions for activities
7.1. Assignment
Do you wish that students submit their work, such as essays, reports or learning diarys only for the teacher to read and evaluate? Assignment is a suitable tool for this purpose.
The submitted assignment is only visible to the teacher, not for other students. If you want students to see each other's submissions for example for commenting, then select forum. Through the assignment activity, submissions can not be published for other students to be seen.
In the assignment, students submit the number of files permitted by the teacher or write a piece of text directly to an editor. The evaluation and feedback provided by the teacher is stored in the course area for a student to see.
Official Moodle documentation: Assignment (opens in new window)
7.2. Forum
Do you wish that students work with course themes by discussing them in one or small groups, or that they submit their work, for example, seminars or essays to read and comment on each other? Are you looking for support for student interaction or whether you want to offer them the opportunity to discuss and ask so that the discussion appears to everyone and everyone can participate in it? Forum is a suitable tool for these purposes.
You can create a number of forums for different purposes. The submission of students' papers on a forum makes it possible for students to read each other's papers and comment on them. If, on the other hand you want students' submissions only be visible to the teacher, then select assignment.
Official Moodle documentation: Forum (opens in new window)
7.3. H5P
Since summer 2023, TUNI Moodle has included two H5P activity types/tools:
- H5P – Interactive Content (black icon): the older plugin developed and maintained by H5P.com.
- H5P core (blue icon): a newer activity integrated into Moodle’s core functions and maintained by Moodle developers.
Reasons for the change:
- The future of the old H5P plugin is uncertain. It will be removed at some point, and its current support is already limited.
- The new H5P activity integrates better with Moodle’s other features, such as the gradebook and progress tracking.⚠️ Note: See limitations below.
- The new H5P activity saves student responses and provides submission reports.
- H5P tasks created with the core tool can be easily reused across multiple Moodle courses.
Timeline
- Now: Teachers: Begin converting your old H5P activities to the new H5P tool.
- Summer 2026: Creating new H5P activities with the old tool will be disabled. Existing activities will continue to function normally.
- Summer 2027: Old H5P – Interactive Content activities are no longer quaranteed to work.
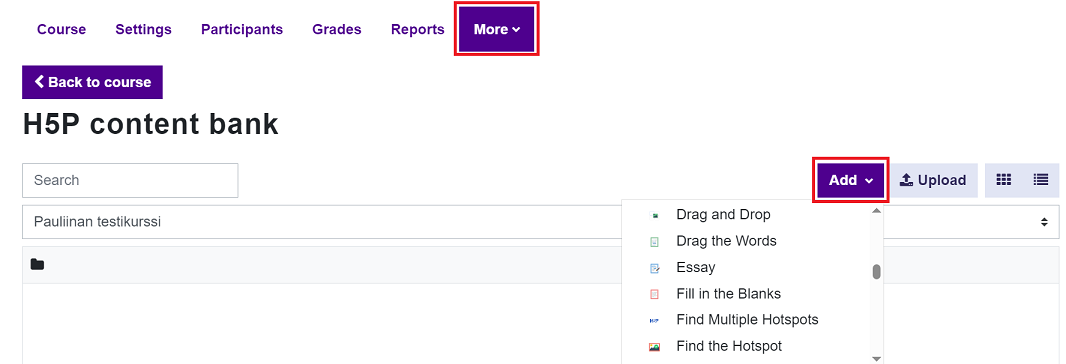
The main difference is in creating and managing new H5P content: You create new H5P content in the H5P Content Bank of the Moodle course. From there, you select H5P content when adding an H5P activity to the course page or embedding via the HTML editor.
You can find the H5P Content Bank under the More tab in the course menu.
Limitations of the New H5P Activity
- Summary and Single Choice content types do not record grades in the gradebook and do not automatically mark completion.
- An error occurs if the teacher who added or copied the H5P activity is removed from the course before anyone (teacher or student) opens the activity. Workaround, if someone other than the main course teacher copies the course:
- That person should remain in the Moodle course with a teacher role, or
- person who made the course copying open all H5P activities once before leaving the course. Opening is sufficient—no need to submit answers.
-
If an Essay question is placed inside a Page content type, students cannot continue editing previously saved answers, even if allowed by the teacher.
Workaround: Students can copy their earlier answers from the submissions history.
What Is H5P Suitable For?
H5P content offers modern, interactive web materials that support diverse learners. Examples include interactive images, videos, quizzes, and exercises.
H5P activities are intended for independent student practice, not for formal assessment.
Not all H5P task types support answer submission or tracking.
Especially older H5P tasks may not record completions at all.
Therefore, H5P tasks are not recommended as a basis for grading or progress tracking.
If H5P tasks are linked to progress tracking or have completion conditions, teachers can manually add missing completion marks in the Activity Completion report.
A new H5P activity is created in two steps:
Step 1: Create an H5P content in the H5P content bank
From the More tab, go to the H5P content bank to create a new interactive content.
Select the H5P interactive content type from the Add menu.
Create an interactive content according to the content type you selected.
Step 2: Add the H5P activity to the course page
- Go to the course page and add new H5P activity (blue icon).
- Give it a suitable name and select the correct content from the H5P Content Bank under Package file.
- If you skip the content bank and drag a .h5p file directly into the activity, it will remain inside the activity and cannot be reused elsewhere.
- Click the drop area or the plus icon.
- Choose the H5P Content Bank view.
- Hover over content to see filenames and select the correct one by left-clicking.
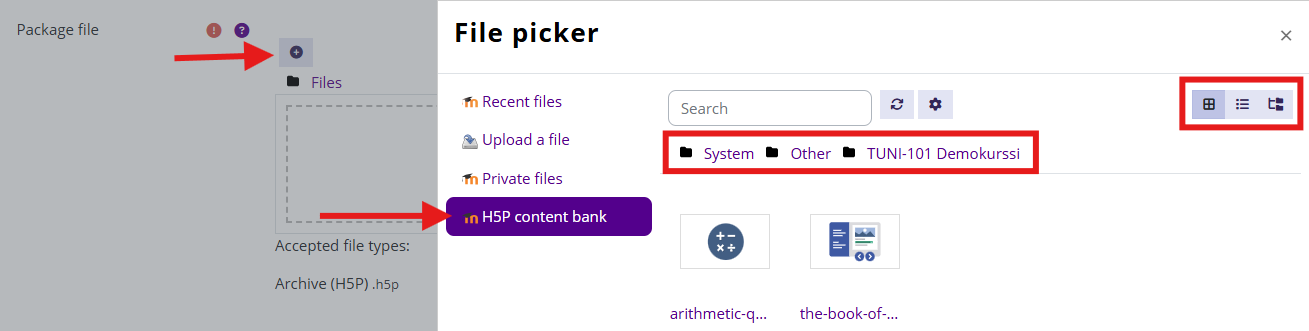
- You can also select H5P files from another course’s content bank.
- Use the buttons on the right to switch between list or tree view.
- Copy or link the H5P file from the H5P content bank to a new H5P activity on a course page
- Copying is the recommended option, because this way the H5P activity remains fully independent and can be edited directly within the activity even after course copying.
- Choose the Link to the file option if the same H5P file is used in several different H5P activities and you want to make changes to all of them at once through the H5P content bank. Note that when a course is copied, the link will still point to the H5P file in the content bank of the old course. This means that editing the H5P activity in the new course must be done from the old course’s content bank.
- Click Select this file.

Configure Additional Settings
- Grading: Optional scoring.
- Attempt settings: Choose whether student responses are saved and whether students can view their submissions later.
Click Save Changes and verify that the activity works correctly in the student view (Switch role to Student).
FAQ
How do I know whether the H5P tasks in my course use the old plugin or the newer Moodle core H5P activity?
The easiest way is by the activity icon:
- Black icon: old H5P activity
- Blue icon: new H5P activity
Additionally, the activity type is shown above the task title on the H5P task page. For the old plugin, it says “H5P – Interactive Content.” The actual H5P content looks the same in both tools.
Will my old H5P content work in the new H5P activity?
Generally, yes. The same .h5p file works in both tools. If the H5P content is old, you may need to make minor cosmetic changes and save it so that the new H5P activity can store student responses and pass grades to the gradebook.
What happens to old H5P tasks after summer 2026?
Existing H5P activities on Moodle courses will continue to work, but you will no longer be able to add new H5P – Interactive Content activities via the “Add activity” menu. However, we cannot guarantee their functionality in the long term.
What happens to old H5P activities when I copy a course? Will they transfer to the new course?
Yes, they will copy and work on the new course area. However, we recommend converting old H5P activities to the new H5P activity format.
How long will old H5P tasks work in TUNI Moodle?
It’s difficult to give a definitive answer. The next major Moodle version upgrade will take place in summer 2027, and the goal is to maintain compatibility for old H5P tasks until then.
Official Moodle documentation: H5P (opens in new window)
7.4. H5P Conversion
H5P Conversion – Converting Interactive Content to the New H5P Format
Many of our H5P users have created materials and assignments using the older H5P Interactive Content tool. This tool will eventually be phased out, and its current support is limited—updates may not work reliably. Therefore, TUNI Moodle will transition to the newer H5P core activity.
This guide helps you convert tasks created with the old H5P tool into the new format.
Step 1: Convert Interactive Content to a File
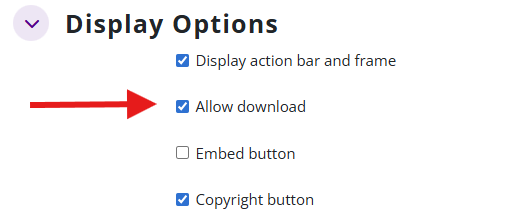
- Open the old activity: “H5P – Interactive Content”.
- Go to Settings and ensure downloading is allowed under Display Options.
- Click Reuse > Download as an .h5p file.
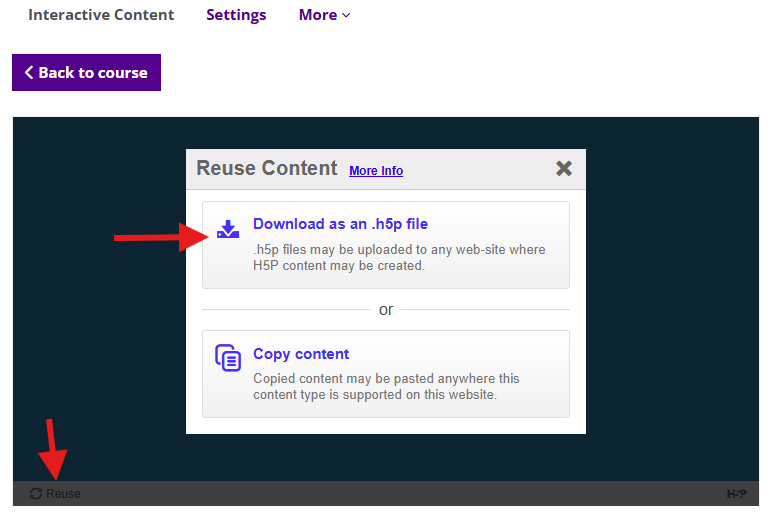
- Save the file to your computer.
- Open your file manager and locate the browser’s default download folder (usually Downloads). Rename the file if needed to something descriptive.
Step 2: Upload the H5P File to the Content Bank
- Return to the Moodle course homepage.
- Click More > H5P Content Bank.
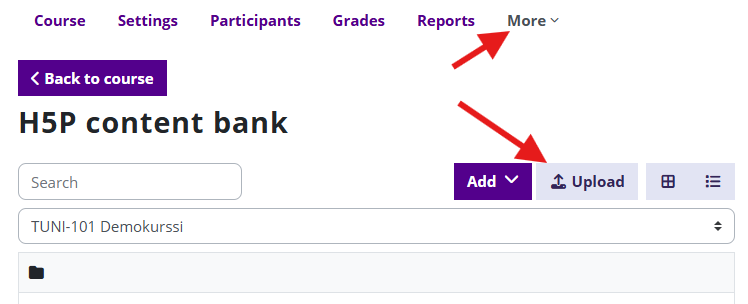
- Click Upload and drag the file from your file manager to the drop area.
- Click Save Changes.
- Edit the H5P content if needed using the Edit button. You can rename the file via the More menu.
- Return to the content bank using the Exit button.
Step 3: Add H5P Content to the Course Page
- Go back to the course homepage and add a new activity: H5P (blue icon).
- Give it a suitable name and select the correct content from the H5P Content Bank under Package File.
- If you skip the content bank and drag the .h5p file directly into the activity, it will remain inside the activity and cannot be reused elsewhere via the content bank.
- Click the drop area or the plus icon.
- Choose the H5P Content Bank view.
- Hover over the content to see file names and select the correct one by left-clicking.

- You can also select H5P files from another course’s content bank.
- Use the buttons on the right to switch between list or tree view.
- Copy or link the H5P file from the H5P content bank to a new H5P activity on a course page
- Copying is the recommended option, because this way the H5P activity remains fully independent and can be edited directly within the activity even after course copying.
- Choose the Link to the file option if the same H5P file is used in several different H5P activities and you want to make changes to all of them at once through the H5P content bank. Note that when a course is copied, the link will still point to the H5P file in the content bank of the old course. This means that editing the H5P activity in the new course must be done from the old course’s content bank.
- Click Select this file.

Configure Additional Settings
- Grading: Optional scoring.
- Attempt settings: Choose whether student responses are saved and whether students can view their submissions later.
Click Save Changes and verify that the activity works correctly in the student view (Switch role to Student).
7.5. Wiki
Are you looking for a tool that is suitable for working in groups and as a tool for student co-writing or, for example, for creating learning diaries? You can use wiki for these purposes. You can create a common wiki for the entire course, wikis for groups, or personal wikis for students. The wiki can be edited by all students on the course if the course has one common wiki, or by all members of the group if the groups have their own wikis. You can build an entity that contains subpages, and students can also create subpages to the wiki. As a teacher, you can track student participation in group work using the version history of the wiki.
Official Moodle documentation: Wiki (opens in new window)
7.6. Workshop
Do you wish that students evaluate each other's submissions based on the evaluation criteria you defined, and that you can as a teacher to evaluate both the student's submission and peer evaluation? Workshop is a suitable tool for this purpose.
As a teacher, you can choose whether the peer evaluation is anonymous or not. The student does not see the work of other students than those who have been given to him/her to be evaluated unless you as a teacher separately publish students' submissions for everyone to see after the workshop has been closed.
Official Moodle documentation: Workshop (opens in new window)
8. How to order special Moodle accounts?
You can order special Moodle accounts to TUNI Moodle for external users.
- Special Moodle accounts can be ordered by Tampere universities staff members
- There has to be a justified reason for the order: e.g. training event with external users as participants
- Special Moodle accounts are free of charge
- Special Moodle accounts are time-limited
- Special Moodle accounts can be ordered only for real persons who do not have any other account that can be used to login to TUNI Moodle
- Users with user account of another Finnish University can login to TUNI Moodle through HAKA login. Do not order an additional special Moodle account for these users.
- Consider if actual TUNI accounts are needed instead. Users will need TUNI account to access other Tampere universities electronic services.
- Special Moodle accounts cannot be merged with TUNI account later, so new employees should always wait for their actual TUNI accounts to be activated.
- Special Moodle accounts will be emailed to the user automatically when the account is created. Account creation or sending the email cannot be scheduled or postponed.
- Orders are generally processed within five working days (excluding holiday periods).
Order special Moodle accounts
Download this Excel file to fill in user details »
You do not have to enable macros in this file, macros are needed only by IT Helpdesk.
Required fields
- User's email address: Note that users with user account of another Finnish University can login to TUNI Moodle through HAKA login. Do not order an additional special Moodle account for these users.
- User's last name
- User's first name
- Default Moodle user interface language (Finnish or English)
- Responsible person (email address): For example your own email or other responsible person's email
Optional fields
- Account end date: If left empty, user account will be active one year. If user account has been inactive over one year, user account will be deleted.
- Course short name: If user should be added to course, check exact course short name from course settings
- User's role in course (if course short name is provided): student, teacher or non-editing teacher
Save and send this file
Send the file filled with user details to IT Helpdesk: it-helpdesk@tuni.fi
9.1. Turnitin instructions for supervisors (TAU)
TAMK supervisor: TAMK uses Wihi system, where the thesis process as a whole takes place. You can use the Turnitin course in TUNI Moodle to support the supervision of work in progress. When you use the Turnitin course template, you make sure that your Turnitin assignments are set up correctly, i.e. incomplete or work in progress papers will not be stored to Turnitin's database.
How do I get my own Turnitin area?
If you do not yet have your own Turnitin course in TUNI Moodle for checking the originality of theses, you can create one in the Other course category using the ready-made Turnitin template.
- Create a new course to the Other course category
- You need a Course Creator authorisation, which you can apply for from id.tuni.fi, see instructions on the linked page.
- Use the Add a new course form
- Name the course area, e.g. to "Turnitin (Your Name)"
- disable the Course end date option (uncheck)
- You can immediately open the course to students by changing the Course visibility setting.
- After saving the form, select the Turnitin Template from the home view of the new blank course.
Quick guide for supervisors to set up their own Turnitin course
Short instructions for supervisor taking the new Turnitin area into use:
1. You will see the new area once you sign in to TUNI Moodle. If you can't find your Turnitin area, please create a new one using Turnitin course template.
2. Open course area to students. Click Managing tools- Show course
3. Your students can access the area as follows:
- set the enrolment key and send it to your students, so they can enrol as users of your course area (Managing tools – Set enrolment key)
- OR select the students manually (Managing tools – Participants)
(If you can't find the student from Moodle users, please ask the student to log in to TUNI Moodle first)
4. There are two Turnitin tools available in the TUNI Moodle:
- Create report about your manuscript: Students can freely use this Turnitin tool while they are still writing their thesis.
- Final originality check: Once the student and supervisor agree that the thesis is finished, the student submits the thesis to this Turnitin tool. The supervisor reviews the originality report.
5. Bachelor’s degrees and master's degrees: If the supervisor serves as the thesis examiner, he or she will confirm that the thesis has undergone an originality check by making a note of it in the examination statement. Doctoral degrees: Inform faculty staff who coordinate the preparations ahead of the award of doctoral degrees of the required Turnitin originality check in accordance with the policy of your faculty.
Inquiries about Turnitin: it-helpdesk@tuni.fi
Please direct other questions about theses to educational administrators in your faculty.
View and interpret the similarity report in Feedback Studio
Se the Turnitin guides:
Classic Similarity Report – Turnitin Guides
Turnitin recognizes text produced by generative AI with certain limitations. Turnitin automatically generates an AI report when the following conditions are met:
- The language of the submitted work is English or Spanish
- The length of the text is between 300 and 30,000 words
- The file type is either .docx, .pdf, .txt, or .rtf
The AI report is only visible to teachers in the Moodle course. This is a choice and decision made by Turnitin. Therefore, the person submitting the work does not see the AI report.
For more information on Turnitin’s AI detection:
AI writing – Turnitin Guides
9.2. Turnitin instructions for students
All the old Turnitin courses for thesis supervisors created before Autumn 2023 were renewed in August 2024:
- The old Turnitin sites were renamed and will remain available until the end of September 2024.
- New Turnitin areas were created for supervisors under the old names.
Students: If you can't find or access the new Turnitin course of your supervisor, please contact your supervisor.
Quick guide for students:
1. Each thesis supervisor has their own Turnitin area "Turnitin (Name of the supervisor)" in TUNI Moodle. The supervisor is responsible for adding students to his/her Turnitin area (Moodle course). The supervisor can give the students a course key, which the student can use to enroll the correct course. Supervisors can also enroll their own students directly in their course. In this case, the course is visible to the student as soon as he or she logs in to Moodle. If you do not see your supervisor's Turnitin area among your own courses in Moodle, please contact your thesis supervisor.
2. There are two Turnitin tools in the Moodle course:
- Create report about your manuscript: Students can use this Turnitin tool freely during the writing process to receive an originality report from draft versions.
- Final originality check: When the student and the supervisor agree that the work is complete, the student uploads his/her work to this Turnitin tool and the supervisor reviews the Turnitin report.
Submitting your own file to the Turnitin tool:
When you click on the Turnitin tool in the Moodle course, you will see date restrictions specified for the Turnitin tool on the page that opens. Below that is a row for your own submission. If you have not yet submitted any file to that tool, the row is empty, but on the right side of it you will see the "Submit Paper" text and an icon. Clicking that link you can upload your document file to Turnitin.
Please note that Turnitin generates only one report per day. After new submission you need to wait the report until next day.
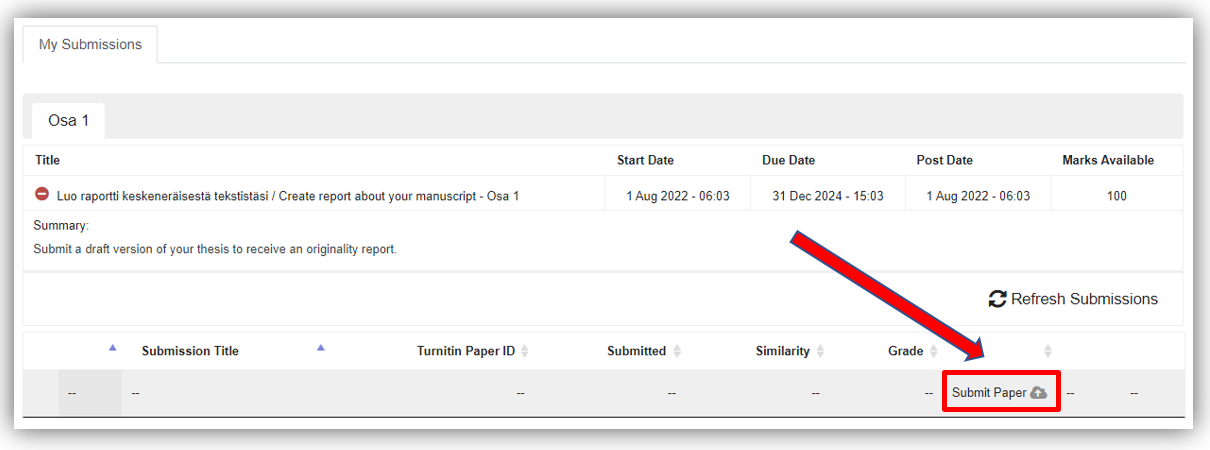
Problem situations
Turnitin does not generate a report, or the Turnitin report displays an error message
- Make sure it's been more than 24 hours since your last file submission to the same Turnitin assignment. Turnitin generates a report only once a day.
- Turnitin cannot process all file formats. If your submission is pending for more than an hour, save your document in PDF format. Use the "Save as" function of the word processor, do not use the Print to PDF function. Open the PDF and verify that you can select and copy text from the PDF. Upload the PDF to the Turnitin assignment, replacing your previous submission.
- Check if your Turnitin service is experiencing a major disruption or outage: Turnitin Status (statuspage.io)
I uploaded the wrong file to Turnitin
- In supervisor Turnitin-Moodle courses, resubmissions are usually allowed, so you can replace the wrong file by uploading the correct file.
- If a resubmission is not possible due to the Turnitin assignment settings and the assignment does not show a Submit paper link, ask your supervisor/teacher to delete your submission so that you can make another submission.
The Turnitin report shows a high percentage of similarity to the version I submitted elsewhere of the same paper
- Your previous submission ended up in Turnitin's database, either accidentally or intentionally. Contact IT Helpdesk and tell us which Moodle course and assignment you submitted your previous submission for, and what was the submission id of your Turnitin submission. The ID number is displayed in the Turnitin assignment and in the email sent by Moodle (Turnitin Digital Receipt).
9.3. How to add Turnitin activity to course
How to add Turnitin activity to course
On a Moodle course select ‘Managing tools’ and Turn ‘editing on’.
Select ‘Add an activity or resource’ and click Turnitin Assignment 2.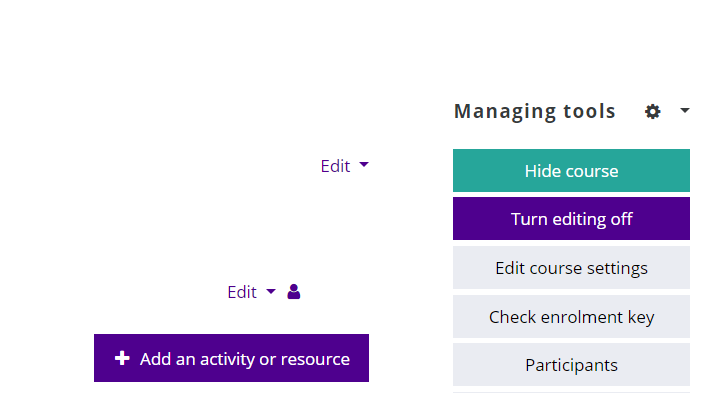
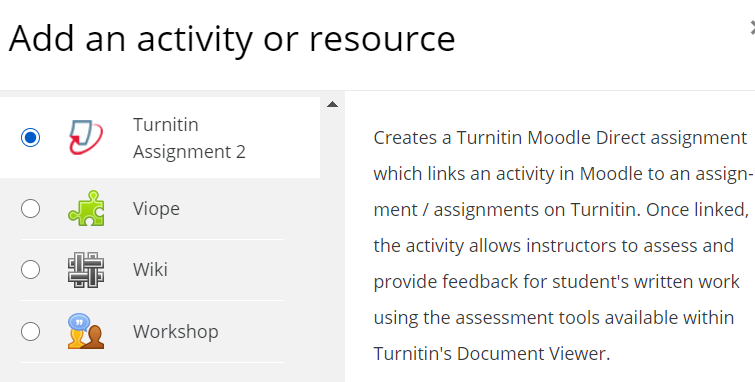
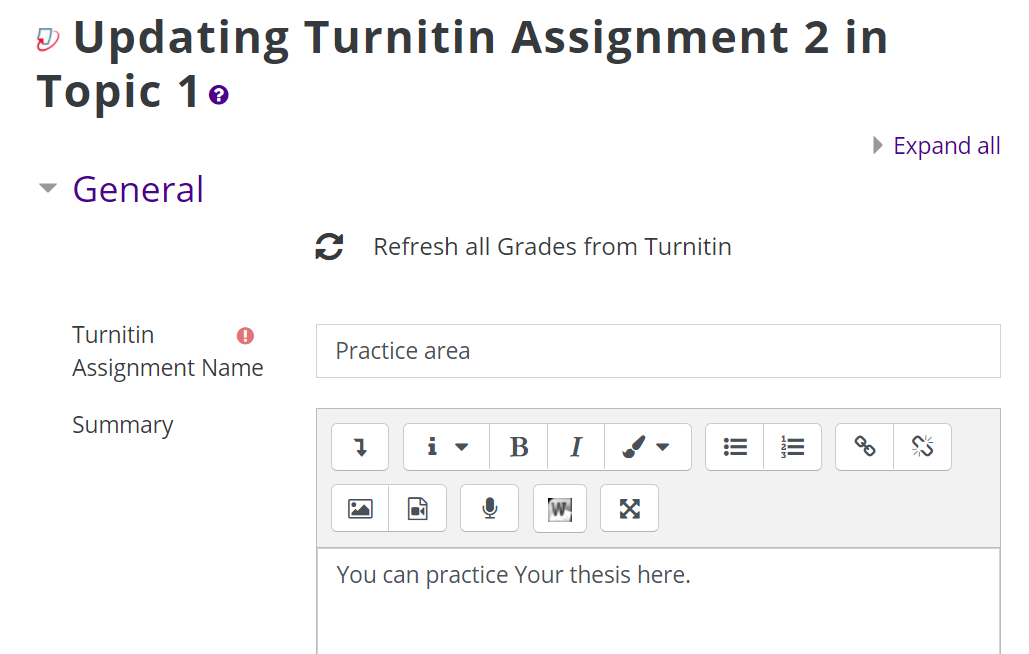
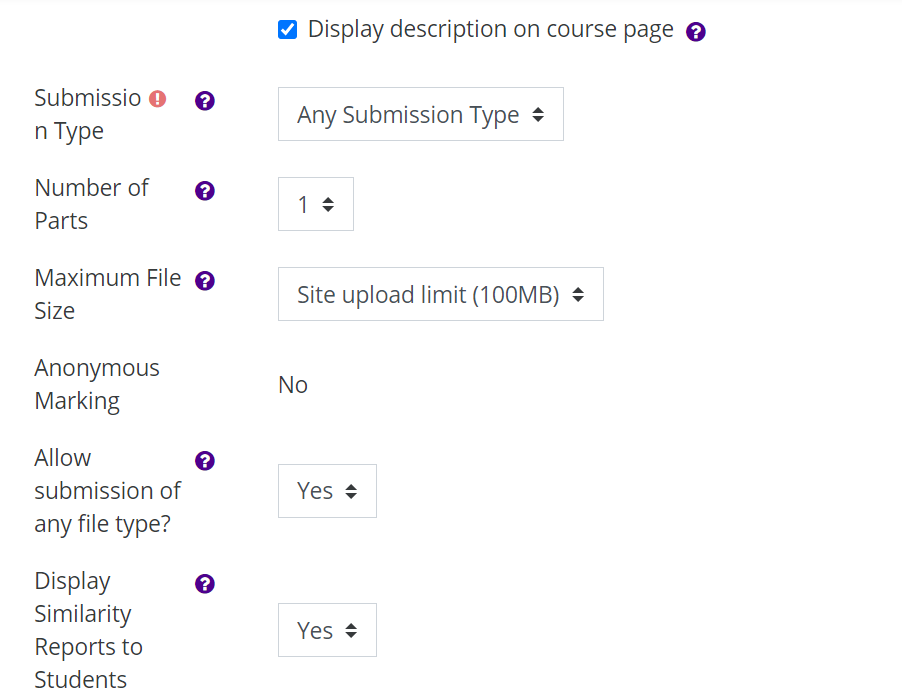
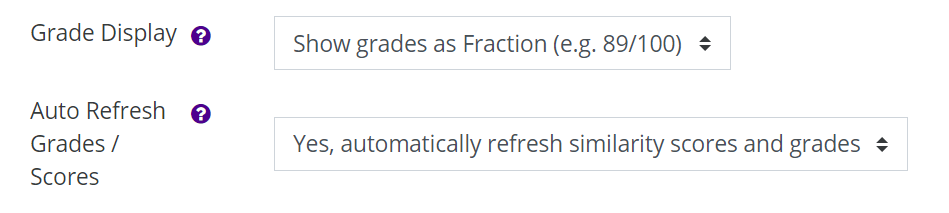

Note: ‘Post Date’ should be next day to Start Date, Students can see all increased comments.
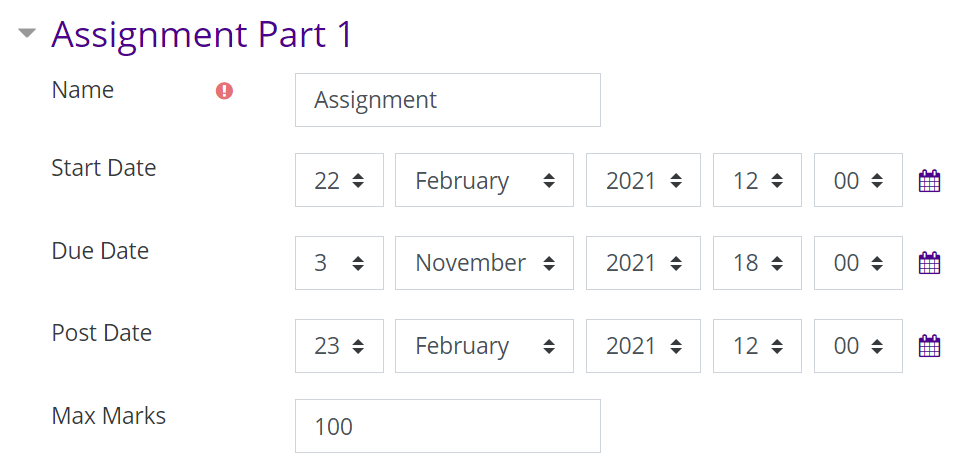
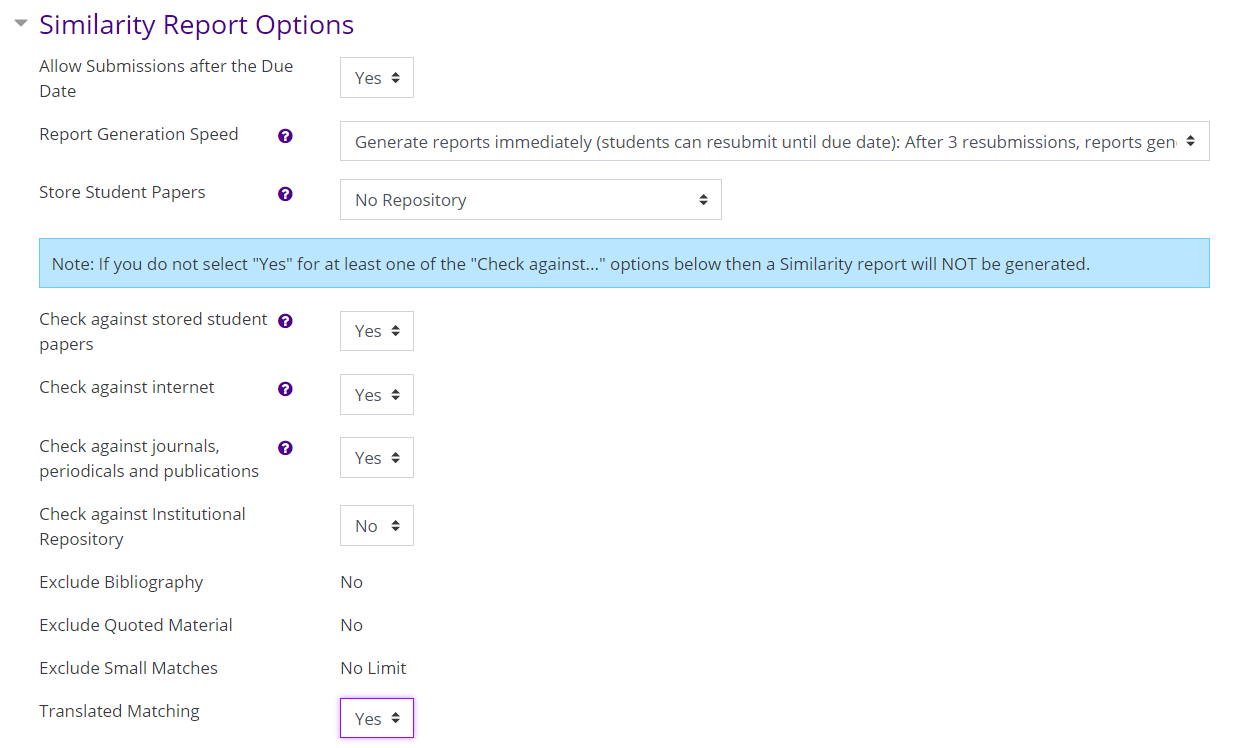
Warning! Select option ’Store Student Papers’ option ‘No Repository’ when using Turnitin in Practice Mode.
Final version Select option ‘Standard Repository’.
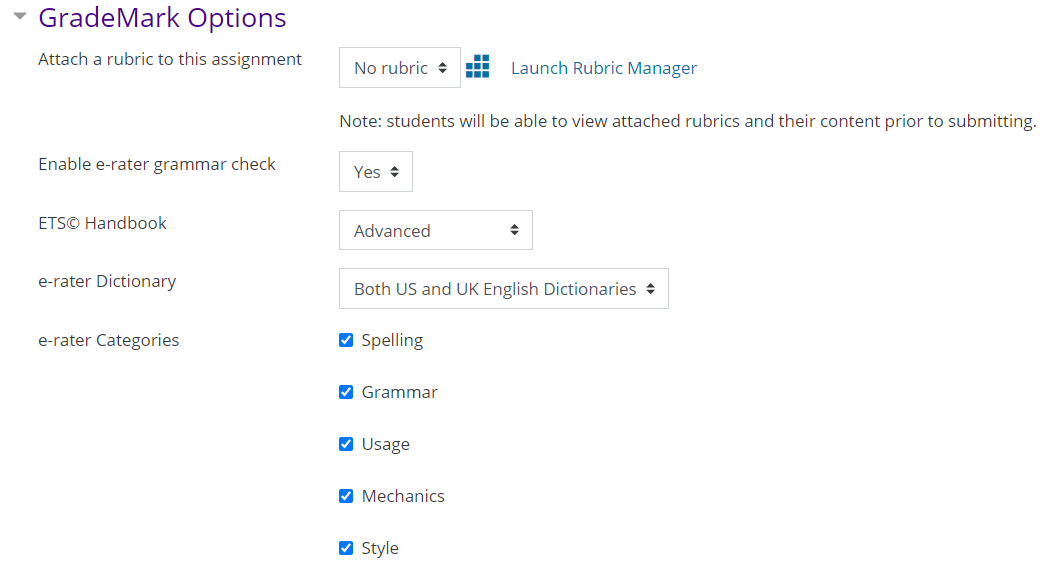
Rest of the Settings are fine.
And now You can add another Turnitin activity, name it for example Final Area, do almost the same choices but remember to choose ‘Store Student Papers’ option ‘Standard Repository’.
9.4. Turnitin checks in other Moodle activities
As a teacher, you can add a Turnitin originality checks to the following Moodle activities:
- assignment
- forum (separate reports for post message and attachments)
- workshop
- essay questions in quiz activity.
In addition to these, Moodle still has a separate Turnitin activity (Turnitin assignment 2). The main difference is that in addition to plagiarism detection, the separate Turnitin activity provides feedback functionality that is missing from the reports in the Turnitin plugin for activities.
How do I turn on Turnitin check in Moodle activities?
Inform students about the Turnitin originality checks in advance in the assignment! Do not enable Turnitin in an activity that has already student submissions.
To enable Turnitin auditing in the activity settings under Turnitin Integrity add-on settings, check the box next to Enable Turnitin:
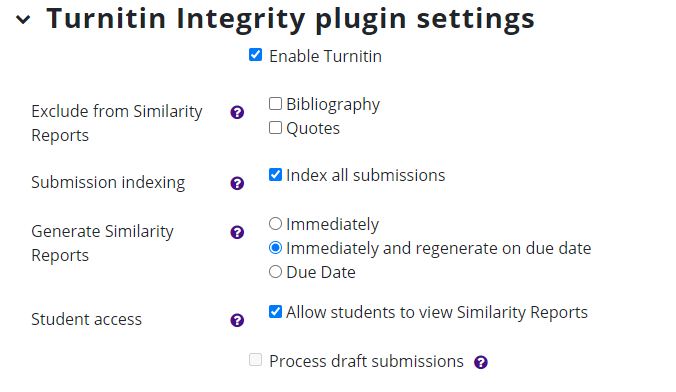
Recommended choices:
- Index all submissions. When selected, student submissions will be indexed anonymously into the Turnitin database and will serve as reference material for all Turnitin checks. Required for Turnitin to compare submissions to each other in this activity.
- Generate similarity reports: Immediately and generate on due date. Specifies at what point the similarity report is generated. This option is available only in the assignment activity. 'Immediately' means that the first report is completed within approx. 5-15 minutes of return. In the new inspection on the due date, all student works returned to the activity will be compared with each other.
- Allow students to view Similarity Reports. The student can see the evaluation report of the submitted work. The view is the same as that of the teacher. Students can only see the report of their own work. In the workshop activity, the student can also see the report received by the peer-reviewed work.
Accepting the Turnitin EULA as a student
The first time a student submits to a forum, assignment, exam, or workshop activity that uses the Turnitin plugin, they must accept the Turnitin EULA. If they don't accept the agreement, their submission will only be saved in the activity and won't be sent to Turnitin for review.
Once approved, the agreement is permanently valid for all Turnitin activities.
If a student has once refused to accept the agreement, he or she can accept it later.
How to open the similarity report?
Moodle displays the Turnitin logo and similarity percentage next to or below the submitted file or text. Click Turnitin Similarity percentage to view the similarity report.
10. AI traffic lights
10.1. AI traffic lights for students
- The teacher decides and communicates the principles for using AI either for the entire course or for specific assignments.
- With AI traffic lights attached to the course or assignments, teachers can guide students how AI is supposed to be used.
- Ask and talk openly about using AI applications. In unclear situations, always check with the teacher.
- The AI traffic lights model used in Tampere universities is based on Arene’s recommendations on the use of artificial intelligence for universities.
Required, must be used, must be reported, affects assessment

Artificial intelligence must be used to create outputs. The student must report how he/she has used AI. Failure to use AI will affect the assessment.
Prohibited, not to be used

The output must be created without the help of artificial intelligence. The student should use only their own knowledge, understanding and skills. The use of AI is forbidden for a justified reason and Will be interpreted as fraud.
Allowed, can be used, must be reported, may affect assessment

Artificial intelligence can be used in the creation of outputs, but the student must clearly report its use. Failure to disclose the use of AI will be interpreted as fraud. The use of AI may affect the assessment.
Allowed, can be used, need not be reported

Artificial intelligence can be used freely and without report to create the output. The use of AI does not affect the assessment.
What does output mean?
Output means the final work or competence produced by a student that meets the objectives of the given learning task. This may be an essay, research report, presentation, project or other concrete work that demonstrates the student's understanding and application of the subject matter.
AI guidelines in teaching and learning at Tampere universities
For students:
For teachers:
Additional information
Instructions in Finnish
10.2. AI traffic lights for teachers
- With AI traffic lights, teachers can guide students on how to use AI in assignments within the course.
- TAU: Teachers are recommended to use AI traffic lights. If the traffic lights model is used in a course, it’s recommended to explain it at the beginning, for example in the course instructions or during the first lecture.
- TAMK: Teachers must use AI traffic lights in all new Moodle implementations starting in 2026.
- The AI traffic lights model used in Tampere universities is based on Arene’s recommendations on the use of artificial intelligence for universities.
Add AI traffic light
You can add AI traffic lights anywhere in Moodle where the content can be edited with TinyMCE text editor (default text editor in Moodle). Typically, it’s best to add the AI traffic light at the end of the assignment description on its own line.
In the text editor, click on the "Lego brick" icon, i.e. the C4L button.

Select AI traffic lights -tab and choose the AI traffic light to insert. There are eight options: four traffic lights in Finnish and four in English.
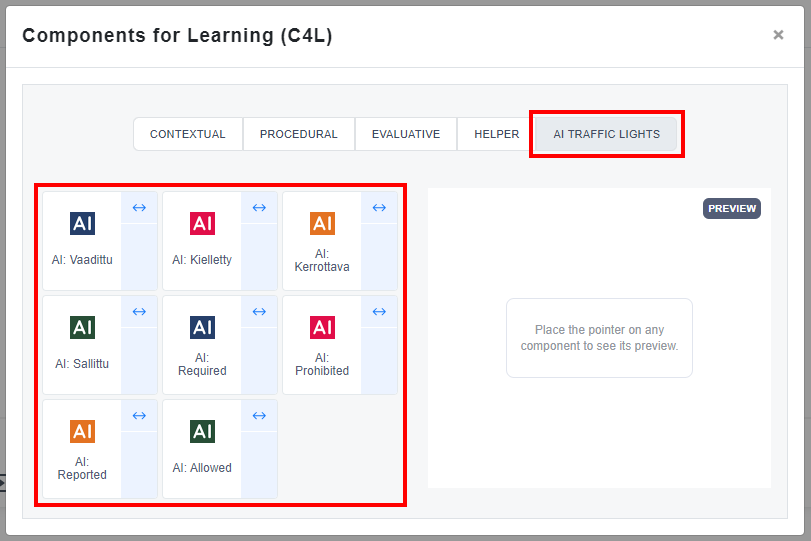
Required, must be used, must be reported, affects assessment
- In this learning assignment, students critically assess the text or other media they produce with artificial intelligence.
- In this learning assignment, students develop the scenarios produced for them by artificial intelligence, for example on the future of their industry.
- In this learning assignment, students create a bot that supports learning or prompts the AI application to serve as a tutor.
- In this learning assignment, students use artificial intelligence as an active assistant and aim to make their work more efficient with artificial intelligence.
Prohibited, not to be used
- In this learning assignment, students demonstrate competence in mastering grammar. Students must write their own essay answers so that their language proficiency can be assessed.
- In this learning assignment, students must reflect on their competence in relation to the assignment. The purpose of the assignment is to assess the student’s ability to reflect on their own knowledge and skills. Artificial intelligence cannot take on the role of the student.
- Solving this learning task with artificial intelligence is easy. To assess students’ competence, they must respond to the assignment with their own information.
- This learning assignment is based on copyrighted material. The material used may not be fed to artificial intelligence.
Allowed, can be used, must be reported, may affect assessment
- During the thesis process, students may use artificial intelligence for purposes such as creating a structure for their thesis and checking their text. However, students must disclose this.
- In this learning assignment, students write an article on the topic of learning. Students can use artificial intelligence to support the introduction and summary.
- In this learning assignment, students create a PowerPoint presentation on the topic of learning. Students use artificial intelligence to visualise their presentation.
- In this learning assignment, students prepare a presentation on a multidisciplinary topic. They may use AI for help in the assignment, but the ways in which AI has been used must be disclosed to enable assessing which share of the assignment is based on the student’s knowledge and which is not.
Allowed, can be used, need not be reported
- In this learning assignment, the use of artificial intelligence does not make students’ work easier. Students may use artificial intelligence if they find it necessary.
- In this learning assignment, students answer the question based on video material in a closed environment. The material is only available with viewing permissions and cannot be downloaded.
- In this learning assignment, students demonstrate their competence in practical situations. Students may use artificial intelligence if they find it helpful.
- In this learning assignment, students familiarise themselves with material in a foreign language. Students use artificial intelligence to translate the materials.
What does output mean?
Output means the final work or competence produced by a student that meets the objectives of the given learning task. This may be an essay, research report, presentation, project or other concrete work that demonstrates the student's understanding and application of the subject matter.
AI guidelines in teaching and learning at Tampere universities
For teachers:
For students:
Additional information
Instructions in Finnish
Adding AI traffic light with old Atto text editor or adding it to other Moodle
1) Download the AI traffic light images to your computer:
- Use of artificial intelligence required
- Use of artificial intelligence prohibited
- Use of artificial intelligence reported
- Use of artificial intelligence allowed
2) Edit the content in Moodle:
- Add the AI traffic light image from your computer to the content and give the image a description with the name of the AI traffic light, for example "Use of artificial intelligence required".
- Add a hyperlink to the image pointing to the student guide for AI traffic lights, using the link address: https://tuni.fi/ai-traffic-lights
AI traffic light images for other materials


11. Mobile app
With Moodle app you can receive notifications from your Moodle course deadlines and other important events.
Download mobile app
Getting started
Start the mobile app and add a new site: moodle.tuni.fi
Login page to TUNI Moodle opens in web browser and after login the app starts automatically.
Your Moodle app is now set but you may wish to synchronize the information. This you can do by clicking the three horizontal lines from the bottom right corner and then choose “Preferences”. On the list the last option is “Synchronize now” and after clicking that your app is fully set to go.
Notifications
By default, notifications from course activities are disabled in the mobile app. You can modify notification preferences from your Moodle user profile preferences.
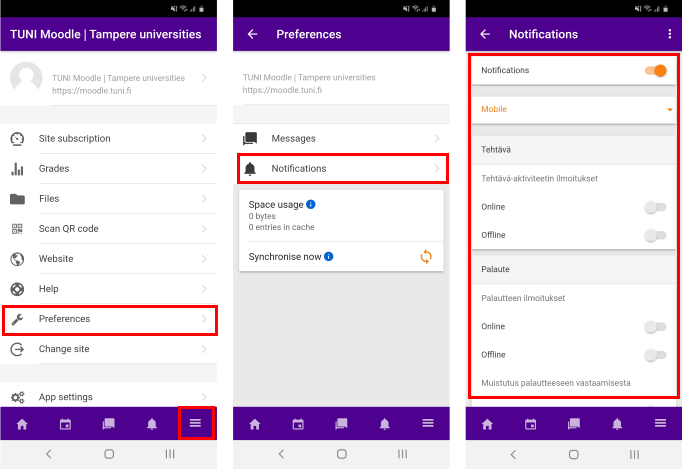
Mobile:
On mobile devices you can find your own Moodle profile by clicking the three horizontal lines (hamburger menu) from the bottom right corner of the screen. You can then choose “Preferences” from your own profile, and then “Notifications”. From here you can edit your own notification settings in your own preferred way.
At least the following notifications are often useful: Feedback, Forum, Lesson and Assignments.
If you wish to turn all notifications on/off, you can turn the uppermost slider “Notifications” from orange/grey. You can also choose if you want to get the notifications to your mobile, to your email or as a popup window.
Computer:
On desktop browser you can find your own Moodle profile from the top right corner by clicking your own profile picture or your initials. After this you can choose “Preferences” from the dropdown menu and then finally open the “Notification preferences”.